At The Bench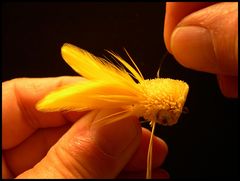 Installing Legs and Eyes on Hair BugsPutting legs on hair bugs is easy if they are put there with The Whitlock Leg Sewing Tool. Installing eyes is also easy if you use a Burning Point to make the eye sockets. Here's how you do it. A popper, diver, or slider made with spun and trimmed deer hair generally has a tail or legs, a collar and/or skirt, and a body. But the lure that almost always has legs and eyes is a fly that is referred to as a hair bug. 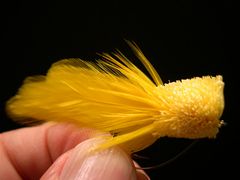 The hair bug in the photo has all of those components except eyes and legs. It is ready to be fished just as it is. In fact, many hair bugs are considered complete at this stage of their construction. But, I like to add the two additional features - legs and eyes - to my hair bugs before I fish them. However, their are any number of patterns that have legs but no eyes, and visa-versa. So, to cover all the bases, this tutorial will show you how to install legs by sewing them through the deer hair and it will also show you how to properly install eyes. Here's how you do both! 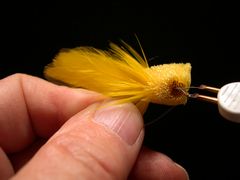 Step 1 Making sockets for the eyes is the first thing that you need to do if you're going to insall both eyes and legs. If you're not going to insall eyes skip this step and step 2. To make the eye sockets use a burning point to burn sockets into the deer hair as shown. To learn more about the burning point check out The Tools Page. 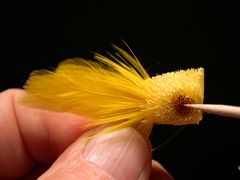 Step 2 Use a round toothpick or a bodkin to clean the bruned hair out of the eye sockets. I prefer a round toothpick over the bodkin because it can also be used later to apply a glue called Goop in the eye sockets. 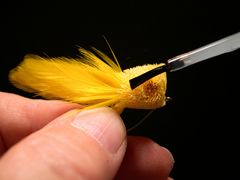 Step 3 Next, turn the bug on it's right side and apply a liberal amount of Dave's Flexament to the eye socket and the area along the hook's shank where the legs will be installed. Then, turn the bug on it's left side and repeat the procedure. The Flexament should be thinned almost to the consistency of water. If you're installing legs but no eyes, simply apply a liberal amount of Dave's Flexament to the area along the hook's shank on both sides of the fly where the legs will be installed. Once the Flexament is throughly dry it will form a tough membrane that will hold the legs. To find out how to thin Dave's Flexament refer to the Glues and Cement's page.  Step 4 To lock the eyes in place add a small amount of Household Goop to each eye socket in preparation for installing the eyes. If you're not familiar with Household Goop, check it out on the Glues and Cements Page. It's an outstanding adhesive that belongs on every bug tiers bench. 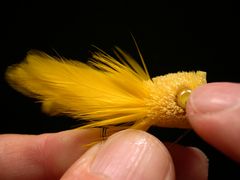 Step 5 Pop the eyes in the eye sockets. 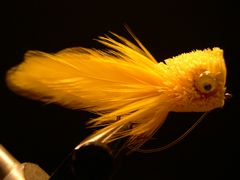 Step 6 Now the waiting game begins. Lay the fly aside (I put mine back in the vice) so the Flexament membrane can thoroughly dry. It takes at least a couple of hours. I generally let the Flexament cure overnight before I sew the legs through the membrane. 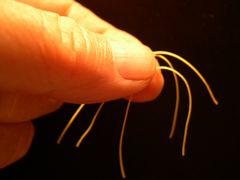 Step 7 Once you are satisfied that the Flexament has cured you are ready to install the legs. But first you have to prepare three strands of leg material about three-inches long. 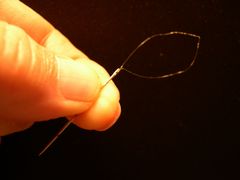 Step 8 You also need to locate your Whitlock Leg Sewing Tool. Directions for making a Whitlock Leg Sewing Tool can be found at: 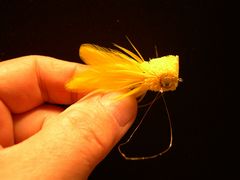 Step 9 Now you are ready to install the legs by inserting the needle point just above the hook shank at the place where the Flexament was placed to form the membrane. If you're in the right place, the needle should meet resistance as it pierces the membrane. Push the needle through the hair until there is enough needle on the other side to pull it and most of the mono loop through. 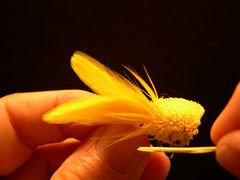 Step 10 Once the needle is completely through the deer hair, pull the tippet through the hair until there is a loop small enough to acommodate the tips of the rubber legs. It helps to moisten the tips with saliva so they stick together during this step. 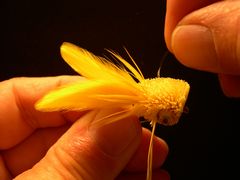 Step 11 Lock the tips into the deer hair as shown and proceed to pull them through the membrane until you have equal length legs on both sides of the bug. Caution!! Do not pull the legs through the hair by grasping the needle. If you do, you will break the connection between the mono loop and the needle. Always pull the legs through the hair by grasping the tippit material. 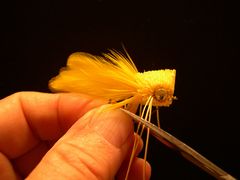 Step 12 Trim the rubber legs to the appropriate length and your legs are successfully installed.
Warmwater Fly Tyer - by Ward Bean
© Copyright 2026 Ward Bean, Council Bluffs, IA, All rights reserved. © Copyright 2026 Ward Bean, Council Bluffs, IA, All rights reserved.
|