Chuggers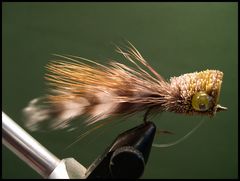 Jack's Fence Rider BugThis little hair bug is one of several unique lures in Jack Ellis's Farm Pond Series as described in his book, "Sunfishes - A Fly Fishing Journey of Discovery." Here is my rendition of the Fence Rider Bug. Materials List
Tying NotesIn The Sunfishes - A Flyfishing Journey of Discovery, Jack Ellis discusses several patterns that he developed specifically for the farm ponds and stock tanks near his East Texas home. He called one of those flies the Fence Rider Bug because, in a manner of speaking, it rode the fence - taking both Largemouth Bass and Bluegills. Jack wrote that it was large enough to get the basses attention and small enough to take large bluegills. The Materials List is identical to the recipe in the book. However, I did take the liberty to change the thread requirement. I use Brown 6/0 Uni-Thread to tie in all of the materials including the "spun" deer hair body. If you're not too rough-handed with 6/0 Uni-Thread, you can easily spin deer hair bug bodies on this and other small hooks. But, I definately wouldn't use 6/0 thread on larger hooks. When the time comes to spin, pack, and trim the deer hair body you might find it useful to refer to (steps 11 through 32) for the Yellow Red Head hair bug found at: Jack prefers to fish with lures that use "natural colored" materials, thus the colors that were stipulated in the recipe. But all colors are optional, so don't hesitate to substitute materials. Jack also ties a diving version of the Fence Rider. If you would like to tie the Dahlberg style Fence Rider go to: Angling Tips Tying Instructions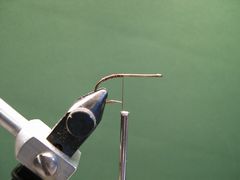 Step 1 Clamp the hook in the vice, crimp the barb, and start the thread at the hook's bend. Lay down a base of thread, for the weedguard, slightly beyond the hook's bend. Then wrap the thread back to exactly above the hook's point. 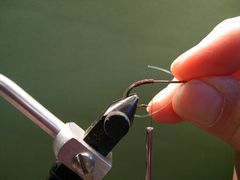 Step 2 Cut a piece of 8# hard monofiliment for the weedguard. Tie in the weedguard covering it and the existing thread wrps with tight thread wraps. Note: I prefer 12# Mason Hard Mono. Size the weedguard by inserting the free end of the guard material through the hook's eye. Adjust the guard, for proper distance from the hook's point, and kink as shown. Flatten the kink with Needle Nose Pliers. 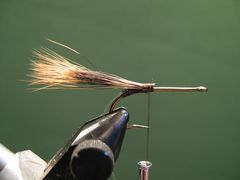 Step 3 To make the post, clip of small bunch of hairs from a Fox Squirrel tail, even them in a Hair Stacker, and measure them against the hook. The Squirrel Tail post should be as long as the hook. Tie the post in so that the butts are flush with the front of the existing thread wraps. Note: Jack suggests that a Squirrel Tail hair post keeps the Marabou tail from rolling around the hook. I eliminate this step because I have no trouble keeping Marabou fibers on top of the hook's shank.  Step 4 Select a Marabou Blood feather for the tail. Measure it against the hook. After the tail is tied in, it should be one and one-half times the length of the hook. Tie in the Marabou tail with close tight wraps with the butts flush with the front of the existing thread wraps.  Step 5 Select two matching feathers from a hen or rooster neck and measure them against the hook. They should be about twice the length of the hook. Trim the the feathers to length.  Step 6 Tie one feather in on the far side of the hook and the other in on the near side of the hook. Take minimal turns of thread as you tie in each feather. Note: You will permenately bind the feathers to the tail with additional thread wraps and glue in the next step.  Step 7 Apply Dave's Flexament to the area where the minimal thread wraps were taken. Then, bind the feather legs down with close tight wraps from the base of the feathers to the front of the existing thread wraps. 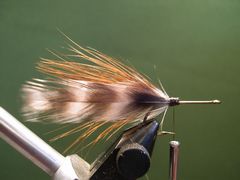 Step 8 Let the Flexament coated thread wraps dry thoroughly before the next step. It takes just a few minutes for the glue to dry. You can speed the process up by drying the glue with a hand held hair dryer.  Step 9 In preparation for tying in the skirt, clip a bunch of deer hairs from the hide that are about the thickness of a milk shake straw. Comb out the underfur then even the hair tips in a hair stacker. Measure the deer hair tips from the standing thread at the tie-in point, near the front of the existing thread wraps. The tips of the deer hair should extend from that point to about the center of the Marabou tail.  Step 10 To form the skirt, tie in the deer hair tips directly on top of the thread windings. Take a couple of loose turns to lay down the skirt and then tighten the thread.  Step 11 Move the thread down to the bare hook shank and take three or four tight wraps of thread against the base of the weedguard. Move the thread forward three or four turns in preparations for spinning the first clump of deer hair. Cut a clump of Natural Deer Hair about the size of a large soda straw, comb out the underfur and trim both the butts and deer hair tips, so you end up with a bundle of hair about one-inch long. Spin the bundle of deer hair on the hook. Pull the thread through the hair and take two tight wraps of thread plus a half-hitch at the base of the hair. Pack the hair as tight as you can against the base of the weedguard with a hair packer. Note:I prefer a Brassie Hair Packer. 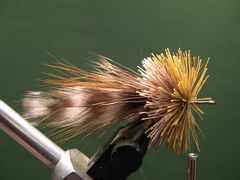 Step 12 Move the thread forward three or four turns and add a bunch of Olive Deer Hair using the same procedure that you used in the previous step.  Step 13 Continue spinning and packing alternate bundles of deer hair until the hook's shank is completely filled. Tie off the thread with a couple of half-hitches or a whip finish. Clip the thread and remove the fly from the vice in preparation for trimming the belly of the bug.  Step 14 Trim the belly flat with half of a double edged razor blade. Don't use a single edged blade. It won't work. Make sure that you don't cut so deep that you cut the thread wraps. Protect the skirt with the finger tips of your left hand so you don't cut the skirt hairs during the trimming process.  Step 15 Put the fly back in the vice and tie off the weedguard. Check out steps 17, 18, and 19 in the Yellow Red Head tying sequence to see how to tie off the weedguard properly. 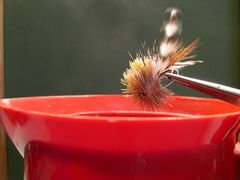 Step 16 Steam the Fence Rider Bug over a pan of boling water, or as in the photo, a Hot Pot. Steam helps the hair to firm up and stand at a right angle to the hook's shank, making the deer hair much easier to trim. 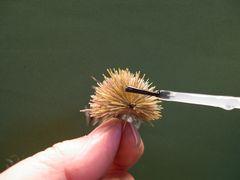 Step 17 Smooth the face of the Fence Rider while the hair is drying. After the hair has dried, apply a thin coat of Dave's Flexament to the face and let it dry. You can speed up drying of the cemented face by blowing on it with a hand held hair dryer. 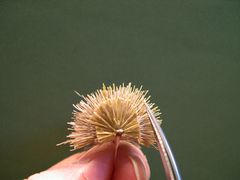 Step 18 After the face of the bug has dried, trim the face with curved scissors. The face should be 3/8th inch square (1cm), rounded at the top. 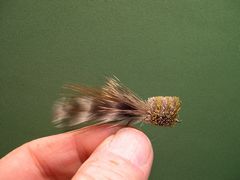 Step 19 Using the face as a guide, rough out the bug's body with curved serreated scissors. Then, finish the final trim with one-half of a double edged razor blade. Check out steps 22 through 27 of the Yellow Red Head to see how the trimming and shaping procedure is properly done.  Step 20 Burn eye sockets for the eyes with a Burning Point or cut the socket to size with the tips of a sharp pair of scissors. To burn eye sockets and properly glue eyes into deer hair, check out steps 29 through 32 in the tying instructions for the Yellow Red Head.  Step 21 Glue the eyes into the sockets by placing a drop of Dave's Flexament in each socket followed by a dab of Household Goop applied with a toothpick.  Step 22 You're Fence Rider Hair Bug is finished!
Warmwater Fly Tyer - by Ward Bean
© Copyright 2026 Ward Bean, Council Bluffs, IA, All rights reserved. © Copyright 2026 Ward Bean, Council Bluffs, IA, All rights reserved.
|