Divers and Sliders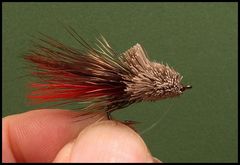 Fathead Diver - NaturalThe Fathead Diver is one of the flies in the Jack Ellis Fathead Series. Materials List
Tying NotesIn "The Sunfishes: A Flyfishing Journey of Discovery," Jack Ellis says that Larry Dahlberg's Diving Minnow is the most important development in warmwater tying since Joe Messinger, Sr. tied his first frog. So Jack developed a miniature version of the Dahlberg Diver to mimic the Fathead Minnows that are found in the ponds and lakes of East Texas. Bass and other warmwater species love these little minnows, and the Fathead Diver in the tying tutorial was designed to imitate those little guys. The Fathead Minnow and its cousins; the Fathead Shad, the Fathead Frog, and the Fathead Diver - Black, are only about one and one-quarter inches long. There are three things to remember when you're tying these flies. First, be sure to allow a large enough loop on the weedguard. Second, make sure that the collar is symmetrical or the fly will float lopsided. Third, be sure that all of the tail materials and the tail windings do not extend beyond the hook's point or you won't have enough room for the head. Angling TipsJack's method for fishing the Fathead Diver is to cast it into the weeds and then dart it out into open water. Small bass and big bluegills that patrol the weeds looking for an easy meal will inhale the fly if you use this tactic. Because the fly is so small, it's a great lure to use on ultra-light tackle. I love to fish it with my 3wt rod. To give the diver maximum action, attach it to your leader with a Duncan Knot or other loop knot. If you aren't familiar with loop knots click on "Warmwater Knots."  Tying Instructions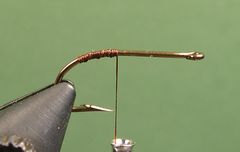 Step 1 Clamp the hook in the vice and crimp the barb. Start the thread on the hook's shank between the hook's point and the hook's barb. Lay a thread base slightly down the hook's bend and then back to exactly opposite the hook's point. 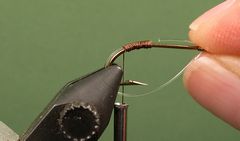 Step 2 Cut a piece of Mason Hard Mono that's a couple of inches long and align it on top of the hook's shank with the front of the weedguard material even with the front of the thread wraps. Be sure the front of the guard doesn't extend beyond the thread wraps. Insert the free end of the guard material through the hook's eye and adjust it so that there is about one-quarter of an inch of space between the guard and the hook's point. Crimp the guard material as shown and flatten the crimped area with a needle nose pliers. You will see later, when you tie off the weed guard, why this step is necessary. 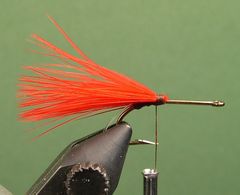 Step 3 Tie in a small bunch of marabou fibers for the first part of the tail. The clump should be at least one and one-half times the length of the hook. Be sure to align the fiber butts with the front of the weed guard material.  Step 4 Tie in a slightly larger bunch of brown marabou fibers directly on top of the red fibers.  Step 5 Wet about an inch or so of the tying thread nearest the hook with Zap-A-Gap and wrap the wet thread on top of the existing tail windings to lock everything into place. Move the thread down to the bare hook shank and take a couple of thread wraps against the base of the tail windings.  Step 6 Clip a bunch of deer hair from the hide that's about the thickness of a soda straw, comb out the underfur, and even the tips in a hair stacker. Trim the butts of the deer hair so that the bunch is at least an inch long.  Step 7 Measure the bundle of deer hair so that the tips extend to about half the length of the tail and stack the hair directly on top of the hook's shank.  Step 8 Spiral the thread forward on the hook's shank as shown. 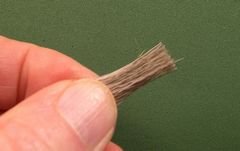 Step 9 Clip a bunch of deer hair from the hide that's about the thickness of a Milk Shake straw, comb out the underfur, and trim the butts and tips so that you end up with a bundle of hair about an inch long. 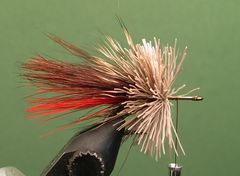 Step 10 Spin the bundle of deer hair. Pull the thread through the hair and take a couple of wraps of thread plus a half-hitch at the base of the hair. Push and pack the hair back tightly against the existing deer hair with a hair packer. Move the thread forward in preparation for spinning the next bundle of deer hair. 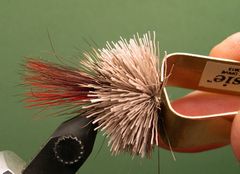 Step 11 Using this same procedure, continue spinning and packing bunches of deer hair until you can't put any more deer hair on the hook. A great hair packer, is the Brassie Hair Packer shown in the photo. 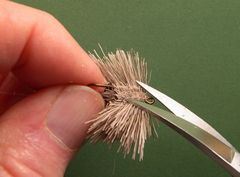 Step 12 Remove the fly from the vice. Trim the belly flat with a curved serriated scissors. Don't cut the skirt or the tail materials in the process. 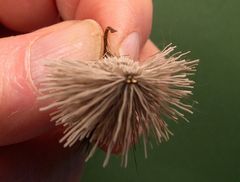 Step 13 This is how the fly should look after the belly has been trimmed properly. 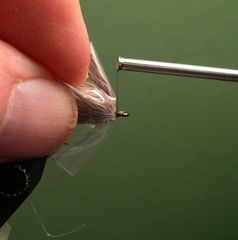 Step 14 Put the fly back in the vice as you prepare to tie off the weedguard. Cut a one inch square piece of plastic bag and poke a hole in the center of it with the point of your scissors. Note: fly tying materials bags work best for this. Put the hook's eye through the hole in the plastic and attach the thread. Wrap the thread back, tight against the plastic.  Step 15 Insert the free end of the weed guard through the bottom of the hook's eye and adjust it by finding the crimp that you made at the beginning of the tying process. Trim the tip of the weedguard flush with the front of the hook's eye. Catch the tip that remains with your thread and bind it down back to the plastic. Take a couple of half-hitches to tie off the thread and the weedguard is secure. 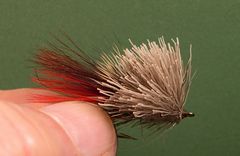 Step 16 Here is how the fly looks, with the weedguard in place, as you prepare to trim the body and collar.  Step 17 With your curved scissors, start just above the hook's eye to rough out the head of the fly. Leave deer hair for the collar as you do this. You will do the final trim with a razor blade. 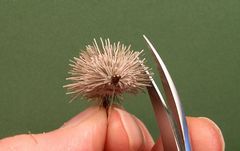 Step 18 Use your curved scissors to shape the collar. Be sure that the collar is symeterical.  Step 19 This is the way the fly should look after you have done the initial trim of the head and collar with your curved scissors. The collar should be about 3/16th inch high and 1/8th inch thick. 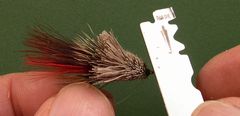 Step 20 Use half of a double edged razor blade to do the final shaping of the head. To make two blades out of one, cut the blade in half with a Kitchen Scissors. 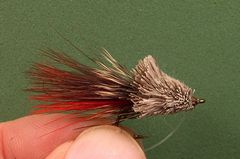 Step 21 This is how the Fathead Diver should look after you have done the final trim of the head and the collar, using the razor blade for the head and the curved scissors for the collar. 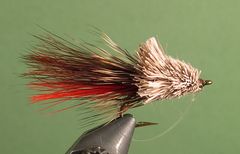 Step 22 Your Fathead Diver is finished.
Warmwater Fly Tyer - by Ward Bean
© Copyright 2026 Ward Bean, Council Bluffs, IA, All rights reserved. © Copyright 2026 Ward Bean, Council Bluffs, IA, All rights reserved.
|