Swimming Flies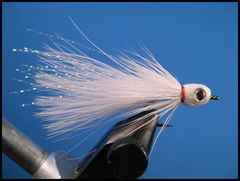 The HairyMara MinnowThe HairyMara was originally tied as a slider with rubber legs. Eventually lead wire was added to sink the fly and the legs were eliminated. As a swimming fly it has proven itself on Crappie and other minnow eaters. Materials List
Tying NotesThe HairyMara has a "reverse tied deer hair head" first used by Mrs. Carrie G. Stevens of Gray Ghost Streamer fame. Nowadays this type of deer hair head is generally referred to as a "bullet style" head. Some fly shops even offer a device to use in place of your fingers to properly form the head and the collar. As you will see in Step 13 in the tying tutorial I use my thumb, index, and middle finger of my left hand to form the head and collar while I'm binding it down with my right hand. This step is the only step in the tying sequence that may give you some trouble, but with a little practice you will make it work better than one of those devices I mentioned earlier. In the tying tutorial I'm tying the HairyMara on a Size 8 hook and the fly ends up between 1 1/2 and 1 3/4 inches in length. I have tied the HairyMara as small as a size 10 and as large as a size 4 in a variety of colors and combinations of colors. I even tie the same fly as a "Slider," generally in olive or black, and that makes it a great topwater bass and bluegill fly. To tie the fly as a Slider click on "HairyMara Slider." Angling TipsEven though lead wire has been added to the HairyMara it remains "neutrally boyant" because of the deer hair head and collar. Neutrally boyant means that the fly doesn't sink to the bottom nor does it float on top. Fished on a weight-forward floating line the HairyMara floats about four to six-inches below the surface. And, at times that works beautifully. If you want to sink the fly faster and deeper, you have two choices. You can add a small lead shot to the leader just in front of the fly or you can switch to a sinking line. 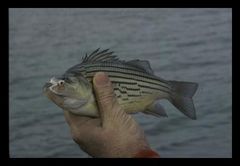
HairyMara's Work I prefer to fish the fly with a five-foot sink tip line. The sink tip line gets the little guy down to the fish and it's neutral boyance makes it look alive in the water. If you can't find a five-foot sink tip line simply cut five feet off of your ten-foot line. That's what I did long before five-foot sink tip lines were available. I got the idea to cut my ten footer back to five-feet from Dave Whitlock. It works great and the line casts much better than before. You definately need to attach the HairyMara to your tippet with a loop style knot. Loop knots allow a fly to move freely therefore giving the fly a more life-like appearance in the water. And, I believe that's especially critical in still water. If you're not familiar with loop knots click on "Tying Warmwater Knots" to find out how to tie them. Tying Instructions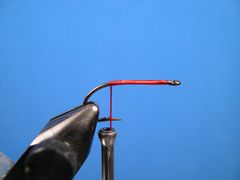 Step 1 Clamp the hook in the vice and crimp the barb. Start the thread at the hook's eye and cover the shank with thread wraps from the eye to the hook's bend. 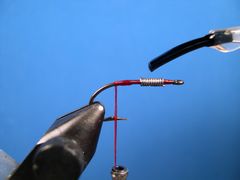 Step 2 Wrap ten or so wraps of lead wire on the shank starting in the middle of the hook. Coat the lead and the thread wraps with Dave's Flexament. 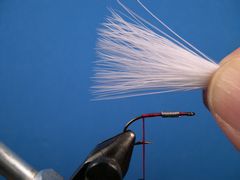 Step 3 Select a marabou plume and measure it against the hook. The amount of marabou tip that should be tied in for the wing should be approximately twice the length of the hook. 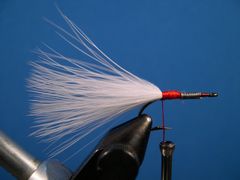 Step 4 Tie the marabou wingi n with tight thread wraps from the hook's bend to the lead wraps. 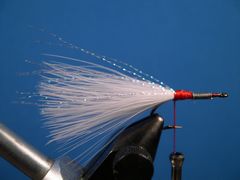 Step 5 Tie in four or five strands of flash material - crystal flash or rainbow thread - on each side of the marabou wing. 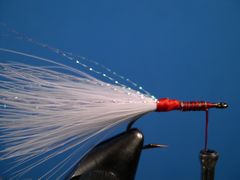 Step 6 Move the thread to about one-half of an eye width behind the hook's eye. 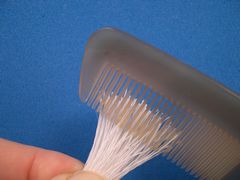 Step 7 Clip a clump of deer hair from the skin and clean out the underfur with a hair comb. The clump of hair, when compressed between your fingers, should be about the thickness of a milk shake straw. You want enough hair to form a collar between the wing and the head. 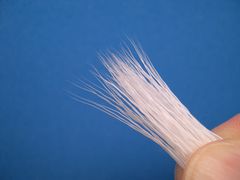 Step 8 Put the clump of hair, tips down, in a hair stacker (evener) to even the tips. 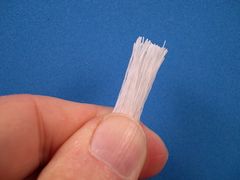 Step 9 Trim the butts of the deer hair bundle so that the bundle is twice the length of the hook. 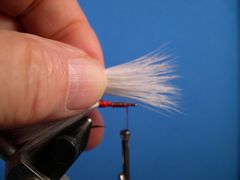 Step 10 Align the deer hair bundle so that the tips protrude from the front of the hook with the butts even with the hook's point. 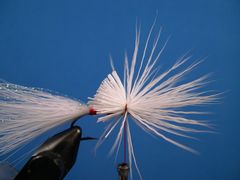 Step 11 Holding the butts with your left hand bind down the deer hair with several tight wraps of thread making sure the the tips completely surround the hook while the butts remain on top of the hook's shank. This is how the deer hair bundle should look after you have completed this step. 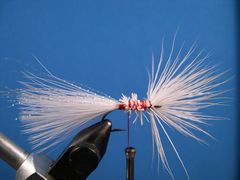 Step 12 Bind down the butts as shown with the thread ending up at the hook's point. 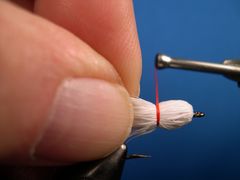 Step 13 Stroke the deer hair tips back with your left hand to make a neat bullet head and a deer hair tip collar that completely encompasses the hook. Take several wraps of the thread to bind down the head and collar. The red thread will simulate gills on the little guy. 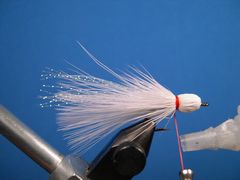 Step 14 Tie off the thread with two half-hitches, a whip finish, or a Zap A Gap knot. To make a Zap A Gap knot wet about an inch of the thread nearest the hook with Zap A Gap and take three or four turns of the wet thread on top of the existing thread wraps. The glue dries in a few seconds. Clip the thread. 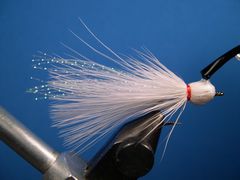 Step 15 Paint the deer hair head and the thread wraps with Dave's Flexament thinned almost to the consistency of water. This seals the deer hair against moisture and also provides a base to glue in the eyes. To learn how to thin and apply Flexament the way I do it, click on "Glues and Cements." 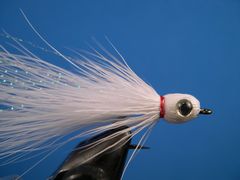 Step 16 With a toothpick put a small dab of Household Goop on the back of each eye and attach them the the head. 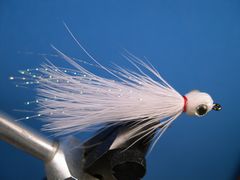 Step 17 Let the eyes dry and your HairyMara Minnow is ready to be fished. In case you are wondering why I call this little fly the HairyMara Minnow, it's because the fly is made from marabou and deer hair. Not very creative, is it?
Warmwater Fly Tyer - by Ward Bean
© Copyright 2026 Ward Bean, Council Bluffs, IA, All rights reserved. © Copyright 2026 Ward Bean, Council Bluffs, IA, All rights reserved.
|