Swimming Flies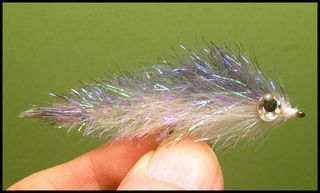 The Jointed MinnowThe Jointed Minnow is my "arts and crafts" fly. I call it an arts and crafts fly because I abandon traditional fly tying techniques and materials (feathers and fur) and opt for super glue for the knots and waterproof markers for the body which is made from a synthetic mylar material called Wapsi Palmer Chenille. This little guy is a lot of fun to tie. Try it - you will like it! Materials List
Tying NotesThe Jointed Minnow is a new version of Ward's Articulated Streamer that was posted on the Swimming Flies Page of Warmwaterflytyer a few years ago. Doug Rorer of Stillwater, MN sent me an email telling me that he had substituted a fairly new material, Wapsi Palmer Chenille, for the hen feathers that were required to make the Articulated Streamer. He also sent me a photo and I liked what I saw even though he didn't trim or color his version. I tie the Jointed Minnow exactly like Ward's Articulated Streamer. The only difference is the Palmer Chenille, dome eyes, and the use of waterproof marking pens to color the chenille. The Jointed Minnow has two parts made with two hooks. The first hook contains the tail and body and the second hook contains the head and the shoulders, both wrapped with Wapsi Palmer Chenille. The two parts are joined together by a hinge made with 9 lb. .013" dia. Mason Hard Mono that is fastened to the hook containing the shoulders and head. Once the fly is made it is removed from the vise and trimmed to a minnow shape with curved serriated scissors. Those scissors work much better than regular tying scissors for shaping the body and the serriations help cut the slippery mylar material. When coloring the fly be particular about the waterproof markers you use. Sharpie markers should not be used because, even though they claim to be waterproof, the color will fade fairly rapidly. The pens I recommend are Prismacolor and/or Copic waterproof markers. Both markers come in a variety of colors and can be found at your local Hobby Lobby Craft Store. As you apply the colors to the fly be sure to bond the colors to the body material by stroking the fly with your index finger, middle finger, and thumb of your free hand as you hold the fly by the hook eye with your right hand. The more you stroke the material the better the colors will bind to the material. Watch out for the hook point as you stroke the fly. I tie tie Jointed Minnow in three color patterns - Shad, Perch, and Sunfish. Here are photos of each pattern and the appropriate color markers used to color them.  Jointed Minnow - ShadUse a Prismacolor Warm Grey 60% for the Shad Pattern. 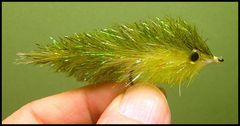 Jointed Minnow - PerchFor the Perch pattern use a Copic Pale Olive marker for the back and a Prismacolor Canary Yellow marker for the belly. 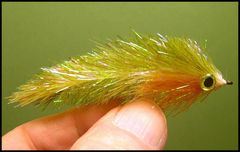 Jointed Minnow - SunfishUse a Copic Spanish Olive marking pen for the back and a Prismacolor Mineral Orange marking pen for the belly. Wapsi Palmer Chenille (Where To Purchase It)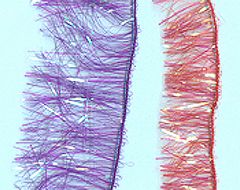 Palmer Chenille is a one-sided mylar tinsel that comes in a variety of colors and in two sizes - small and medium. Be sure to use medium Pearl Palmer Chenille for the Jointed Minnow. If you can't find Palmer Chenille at your local fly shop or they won't order it for you, you can order it from my good friend and fishing partner Michael Jacobs who owns a couple of clothing stores and a fly tying materials mail order business called Hawkeye Fly Tyer. Mike offers all of the materials - Uni-Thread, hooks, lead wire, marabou, eyes, and Palmer Chenille at very reasonable prices. Here is how to contact Mike to order all of the materials for the Jointed Minnow. Mike Jacobs
Angling TipsThe Jointed Minnow casts well with a five or six-weight rod. The fly is lightly weighted with .20 dia. lead wire so it can be fished with either a floating or sink-tip fly line. Fish the Jointed Minnow like you would fish any other streamer. Tying Steps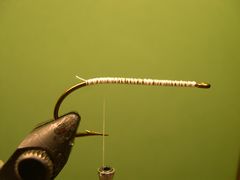 Step 1 To build the tail and body of the Jointed Minnow, clamp a Size 2 Mustad 3366 hook in the vice for the body and start the thread. Lay down a base of thread from the hook eye back to the hook bend. 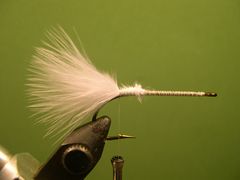 Step 2 Tie in the tip of a Marabou Blood feather for the tail. The tip should be about half the length of the hook. 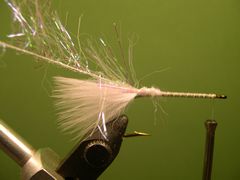 Step 3 Attach the Palmer Chenille at the base of the marabou tail the same way you would attach a piece of common chenille, then wrap the tying thread to the eye of the hook. 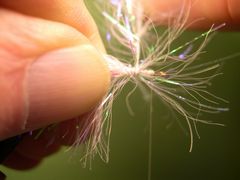 Step 4 Wrap the chenille forward and sweep back the fibers with the fingers of your free hand as you make wraps with your right hand. Doing this keeps you from binding down the fibers. Be sure that the wraps are tight against each other as you palmer the chenille forward to the hook eye.  Step 5 Once you have palmered (wrapped) the chenille to the hooks eye, tie off the thread with brush-on Super-Glue knot. Simply moisten an inch or so of thread nearest the hook with the glue and wrap the wet thread over the previous wraps. Clip the thread and remove this part of the minnow from the vice. Lay it aside until you are ready to attach it to the front part of the minnow. 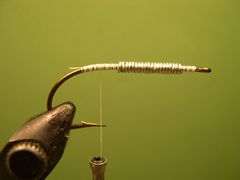 Step 6 To build the shoulders and cheeks of the Jointed Minnow, clamp the second hook in the vice, lay down a base of thread from the hook eye back to the bend, and then add about eighteen to twenty turns of .020 dia. lead wire. 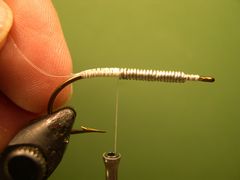 Step 7 To make the hinge that will join the two hooks, cut a one-inch piece of 9 lb. Mason Hard Type Mono from the spool and bind it to the top of the hook shank from the lead wraps back to the hook bend. 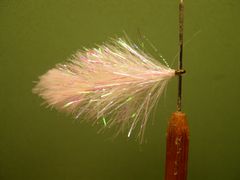 Step 8 Take the tail and body portion shown in Step 5 and remove the hook bend with a pair of side cutters. Make sure that you don't accidentally cut the materials in the process. Next, give it a rough trim with the curved serriated scissors so that it has a minnow shape. Don't over- trim because you will do the final trim when the minnow is near completion. Campare the photo in this step with the photo in step 5 to see how it's done. 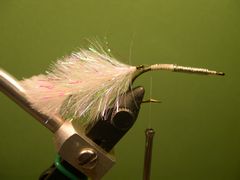 Step 9 Run the tip of the mono hinge through the eye of the hook that will be the tail and body and pull the tip of the mono toward the lead wraps in preparation to tie down the mono to the hook shank. Before you bind down the mono, check to see that the eye of the body and tail hook is almost touching the thread wraps at the bend of the head and shoulders hook. Once you are satisfied with the size of the hinge, bind down the mono tip back to the lead wraps and remove any excess.Click on the photo to get a larger view of the size of the hinge. 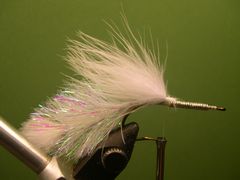 Sstep 10 Tie in the tip of a Marabou Blood feather in front of the lead wraps that is an inch or so long . This is necessary to hide the hinge and also to fill in the gap between the two body parts. If you don't use the marabou their will be a distinct gap between the two parts. 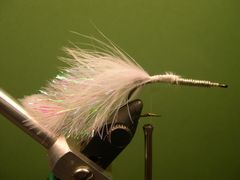 Step 11 Bind the marabou to the shank back to the base of the hinge. 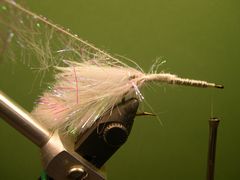 Step 12 Attach a piece of Palmer Chenille and repeat the same process that you followed in steps 3, 4, and 5.  Step 13 Tie off the minnow with a super-glue knot and remove the thread. 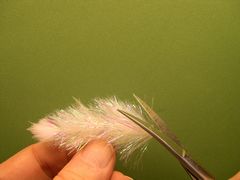 Step 14 Remove the fly from the vice and proceed to trim it to shape with a pair of curved serrated scissors. Try to give it the shape of a minnow. Trim as much or as little as you want. I like my minnows to be fairly slim. The final or touch-up trim will come after the body colors have been added.  Step 15 Here is how the minnow should look after it has been trimmed. Notice how the marabou tip filled in the space between the two body parts. 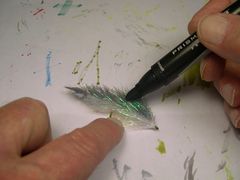 Step 16 Lay the minnow on a piece of paper and apply the first layer of color. In this case we are making a shad finish so the back of the fly will be gray and the belly will remain pearl. 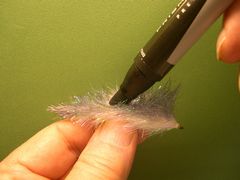 Step 17 Click on the photo to see how I apply additional color to insure that all sides of the Palmer Chenille is adequately colored. 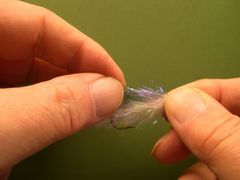 Step 18 During the coloring process be sure to stroke the body of the fly frequently to set the colors. This process, which involves holding the fly by the hook eye with your right hand while stroking the colored fibers with the thumb, index, and middle fingers of your left hand, will bond the colors to the materials to help ensure that the colors won't fade. 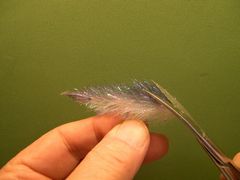 Step 19 After you are satisfied with the coloring of the minnow it's time for a final trim.  Step 20 The last step is to glue on the molded eyes. All you do is add a bit of Household Goop to each side of the head with the point of a round toothpick and stick on the eyes. When the Goop dries your Jointed Minnow is finished and ready to be fished. Good Luck! By the way, if you're not familiar with Goop you can buy it at any hardware, craft, or home supply store.
Warmwater Fly Tyer - by Ward Bean
© Copyright 2026 Ward Bean, Council Bluffs, IA, All rights reserved. © Copyright 2026 Ward Bean, Council Bluffs, IA, All rights reserved.
|