Swimming Flies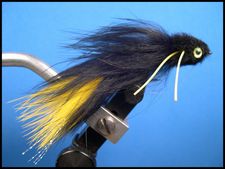 The Yellow TailThe Yellow Tail is a jointed fly that is composed of two parts joined by a hinge made from a monofiliment loop. The loop is used to atttach the back part of the fly to the front part. It is one of many articulated (jointed) flies in my "bug box" and it's deadly on preditory fish. Materials List
Tying NotesThe Yellow Tail has all of the components of a dynamic warmwater fly. The dark body with a contrasting yellow or chartreuse tail has been proven time and again to be attractive to fish. The bright yellow legs lend animation to the fly and the head and eyes provide a strike target for the fish. Observe the fly in the water and you will see the magic of articulated (jointed) flies. Both parts moving independently of each other causing an undulating movement that really makes the lure look alive. Before the rear of the fly is attached to the front, the hook point and bend are removed with a pair of side cutters. So the finished fly has only one hook to stick the fish. The hinge is made from 8 pound Mason Hard Type Leader Material often referred to as Mason Hard Mono. You could use 10 pound but I think 8 pound works better. I use 1/16th inch wide rabbit (Zonker) strips. Standard Zonker Strips are 1/8th inch wide and Magnum Strips are generally 1/4 inch. You can use the standard Zonker Strip but your fly will be a lot fatter than the one in the tying sequence. You can purchase 1/16th inch rabbit strips. In the catalogs they are referred to as "Trout Zonkers." You can buy Trout Zonkers from Bob Marriott's Fly Fishing Store. Angling TipsThe Yellow Tail is unweighted. Jointed flies loose much of their action if weight is wrapped on the hook or lead eyes are attached as part of the head. If you want to fish the lure "down and dirty" or in moving water, add a split shot or two to the leader about 18 to 24 inches above the fly or use a sinking line. If I'm fishing the fly in still water I generally use a weight-forward sink-tip line that has been cut back to five feet. Whether you're fishing moving or still water use Kelly Gallop's "jerk-strip" retrieve. Jerk the fly by swiftly moving the tip of your rod several inches to the left and then strip the line a few inches. This method really imparts a lot of motion to the fly. Tying Instructions Step 1 To begin building the rear part of the fly, insert the SIZE 4 hook in the vice, attach the thread at the hook's eye and lay down a thread base back to the bend. 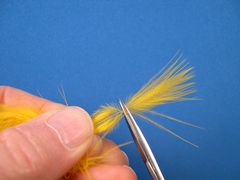 Step 2 Select a yellow blood marabou feather and prepare it by stroking back the fronds to expose the tip. Remove about an inch or so of the tip with your scissors. 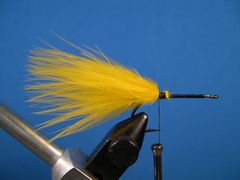 Step 3 Stroke the fronds forward and tie in the marabou for the tail as shown. The tail should be at least twice the hook's length and longer if you choose. 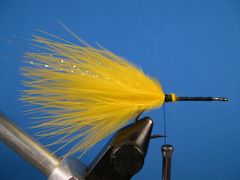 Step 4 Select a couple of strands of Crystal Flash or Rainbow Thread. Fold and cut them so you end up with several strands of equal length. Then attach the strands of flash material so it ends up on both sides of the tail. 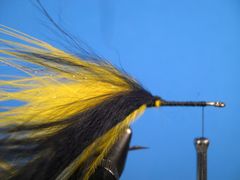 Step 5 Attach a piece of rabbit strip, hair side up, on top of the tail's thread windings. 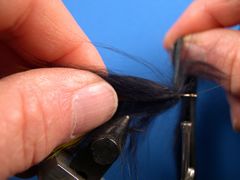 Step 6 Wrap the rabbit forward making sure that the hide side, not the hair side, is surrounding the hook's shank. Continue wrapping the rabbit strip to the hook's eye and tie it off with a couple of tight thread wraps. Remove the excess rabbit strip and form a neat thread head. Then remove the thread.  Step 7 This is how the rear part (tail) of the fly should look when it's finished. Note that the eye is not crowded by the rabbit fur. 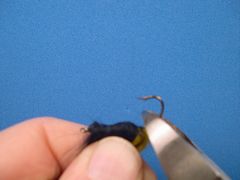 Step 8 Remove the tail from the vice. Stroke back all of the materials toward the hook's eye and remove the back part of the hook with a pair of side cutters as shown in the photo. Cut as close as you can to the matrials but don't nick the thread. Lay the tail aside for installation later. 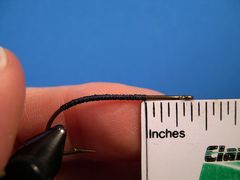 Step 9 Insert the SIZE 2 hook in the vice, crimp the barb, and attach the thread a mid-shank. Lay down a thread base slightly down the hook bend. Reverse the thread and make tight wraps of thread back to 1/4 inch from the front of the hook's eye. Measure, if you're not sure. I do. 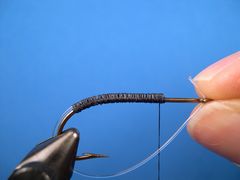 Step 10 Clip a three-inch peice of Mason Hard Mono and align the front of the guard matrerial with the front of the thread wraps. Lash the guard material to the shank, completely covering it and the existing thread base with thread wraps. Size the weedguard now so you won't have to size it later with the wool head in the way. Insert the tag end through the hook eye, adjust it to size, and kink it. Flatten the kink with needle nose pliers and cutt off any excess leaving about a quarter inch mono tip above the kink.  Step 11 To form the hinge that will attach the rear and front parts of the fly you first must cut a three inch piece of 8 pound Mason Hard Mono to be used for the hinge. Aligh the tip of the piece of mono with the front of the weed guard on the far side of the shank and tie it in with close tight wraps back to the hook's bend. Insert the tag end of the mono through the eye of the rear part (tail) of the fly and adjust it so that the hinge allows the tail to be positioned as shown in this photo and in the photo in step Step 12. Once the adjustment is made, lash the tag end of the mono to the near side of the hook with close tight thread wraps and trim the excess mono as shown. 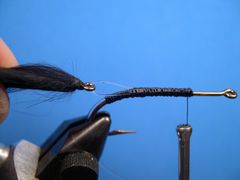 Step 12 This photo shows the correct position of the tail relative to the hook. Note the relationship of the tail's eye to the hook bend. 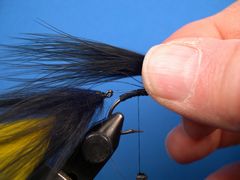 Step 13 Now you're ready to build the font (body) of the fly. First take a small bunch of marabou and measure it as shown. It will be tied in as an apron that will cover the hinge.  Step 14 Tie in the clump of marabou with the thread ending up at the hook bend. 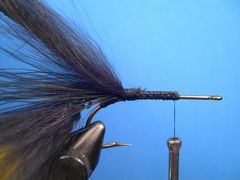 Step 15 Attach a rabbit strip on top of the thread wraps fur side up just as you did in step 5. 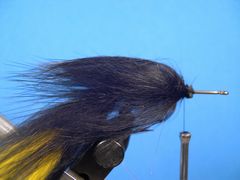 Step 16 Wrap the rabbit strip forward using the same precautions that you used in Step 6. Bind down the strip with several wraps of thread and remove the excess. Finish up the tie down area with several wraps of thread as shown. 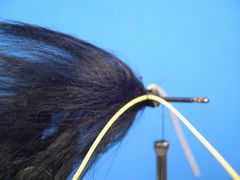 Step 17 Cut a five inch strand of round rubber into equal parts for the legs. Tie one strand in on the far side of the hook and the other strand on the near side of the hook as shown. Move the thread down to the hook shank and completely cover the shank with thread in preparation to tie in the wool head. Notice the position of the thread standing ready for the first clump of wool. 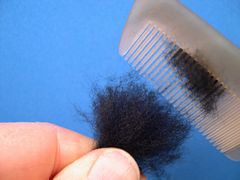 Step 18 Cut a clump of wool from the hide and comb out the tangles. 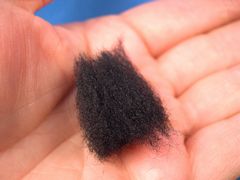 Step 19 Clip both ends of the clump so that it ends up about an inch long and looks like this.  Step 20 Center the front of the clump at the hook's eye and gently move it back until the clump is centered over the hanging thread. To properly center the wool with half of it on either side of the hanging thread you may have to wiggle the the thread through it whil you keep in in position with the fingers of you left hand. 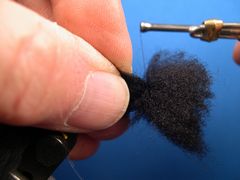 Step 21 Grasping the wool tightly with your the fingers of your left hand, make two loose wraps of thread directly on top of each other, and tighten the thread by pulling straight down. Make sure that the wool doesn't spin on the hook during this process. 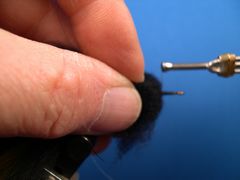 Step 22 Wiggle the thread through the wool and bring it up to the shank in front of the clump as shown. Pull back on the clump with a three-finger pull back and take several tight wraps of thread against the base of the wool. Move the thread to the center of the space remaining on the shank in preparations to tie in the second clump of wool. 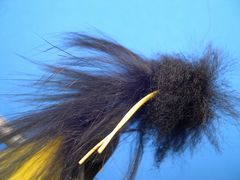 Step 23 Prepare and tie in a second clump of wool in the same manner that you did the first clump. When that step is complete, tie off the fly with a couple of half-hitches and remove the thread. This is the way the fly should look just prior to it's first trim. Looks pretty ratty, but not for long. 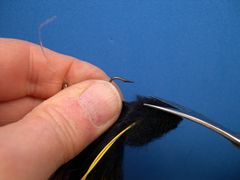 Step 24 Remove the fly from the vice and turn it upside down so you can trim the belly with your curved scissors. The belly should be trimmed fairly flat. After you're satisfied with the the belly, move to the sides and the top to roughly trim the head into a minnow head shape. The finishing trim will come later. 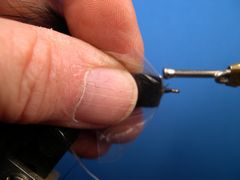 Step 25 Return the fly to the vice to tie off the weed guard. Poke a hole with your scissors tip in the center of a one-inch square piece of plastic bag and push the hook eye through the hole. Attach the thread and wrap it back against the plastic until you have 1/16th inch of space between the eye and the base of the wool. 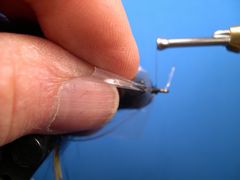 Step 26 Insert the tag end of the weedguard through the eye and take a couple turns of thread to bind it down. Adjust the guard so that it is about a half of gap width below the hook barb. 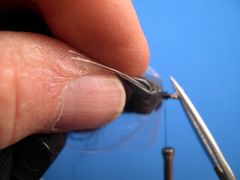 Step 27 Cut the weedguard tip flush with the front of the hook's eye with your scissors. Catch the tip with the tying thread and bind it down. Tie off the thread with two half-hitches and remove the thread. 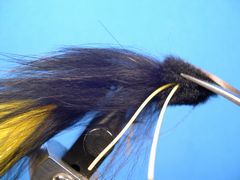 Step 28 Now give the head it's final trim. Keep trimming the top and the sides to achieve a minnow shaped head as shown. 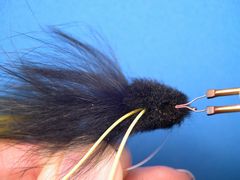 Step 29 Remove the fly from the vice to install the eyes. First, burn eye sockets with a Burning Point or cut them with the tips of your scissors. I prefer a burning point as shown in the photo.  Step 30 Next, scrape the burned fur out of the eye sockets with the tip of a round toothpick. You will use the toothpick again later. Then add Dave's Flexament, thinned almost to the consistency of water, to each eye socket in preparation for setting the eyes. 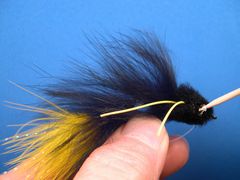 Step 31 With the round toothpick put a dollop of Household Goop in each eye socket. Household Goop can be purchased at any hardware store. 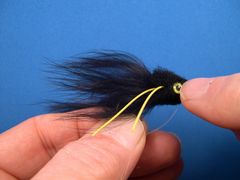 Step 32 Install an appropriately sized yellow molded plastic eye in each eye socket. 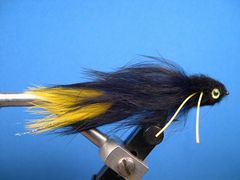 Step 33 The completed Yellow Tail.
Warmwater Fly Tyer - by Ward Bean
© Copyright 2026 Ward Bean, Council Bluffs, IA, All rights reserved. © Copyright 2026 Ward Bean, Council Bluffs, IA, All rights reserved.
|