Wet Flies The Wooly WormThe Wooly Worm is an ancient fly dating back to the time of Dame Julian, an avid angler and British Princess. Materials List
Tying NotesIf you are ever in a position where you need to teach someone how to tie flies or you are asked to teach a fly tying class the Wooly Worm would be a great fly to begin the instructional process. It's one of the simplest flies to tie and it's also a great fish producer. It also provides the foundation for beginning students to tie more complicated flies. The student who sucessfully ties a Wooly Worm will learn how to attach thread to a hook's shank, tie in tail materials, attach and wrap fly tying materials such as chenille, and palmer a feather along the hook's shank. The Wooly Worm has a long and storied past. Dame Julian Barnes, an avid anglerEnglish Princess, wrote about her version of the Wooly Worm in her extensive treatise on the art of angling with a fly at about the time that Columbus was discovering the new world. In the mid-1600's Isaak Walton published the Complete Angler and Charles Cotton, who wrote most of the material on fly fishing in the book, described a similar fly with a wool body that resembled the small caterpillars that fell onto his favorite rivers. It could be that his fly was latter named the Wooly Worm. It has been said that Pennsylvania fly tyer Russell Blessington, the creator of the ubiquitous Woolly Bugger in the 1960's, took his inspiration for that great little streamer from the Wooly Worm. Today, the Wooly Worm is tied in a variety of sizes using a variety of materials for the tail and the body, but the traditional Wooly Worm has always had a red wool tail, chenille body, and palmered grizzly hackle. The Wooly Worm in the tying instructions is tied on a 3X Mustad 9672 hook in size 6 but I have seen them tied on a variety of hooks including 1X wet fly hooks down to size 12. Before you begin to tie the Wooly Worm it would be a good idea to check out the "Tying With Chenille" page to learn how to rejuvenate crushed chenille. Most chenille, when it comes off the card, is in bad shape and steam will make it right for tying. There also is a great tip on that page that helps you wrap chenille properly. Angling TipsThere is no wrong way to fish the Wooly Worm. Fish it with short strips, let it drift, fish it under a strike indicator, or fish it with a wet fly swing. Any tactic will work under different circumstances and conditions. Tying Instructions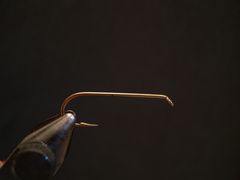 Step 1 Clamp the hook in the vice and crimp the barb. 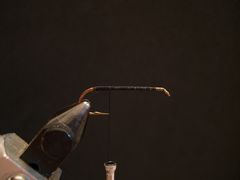 Step 2 Start the thread behind the hook's eye and lay down a thread base back to the hook's bend. 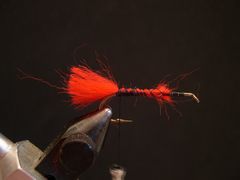 Step 3 Tie in a small piece of red wool for the tail. Return the thread to the hook's bend for the next step. 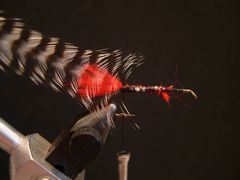 Step 4 Select an appropriate rooster neck feather and tie it in by its tip at the base of the tail with the feather's curved side facing the hook. 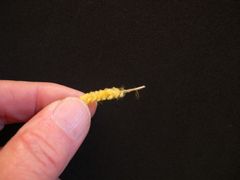 Step 5 Prepare a piece of yellow chenille by stripping some of the chenille off the core with your fingernail. 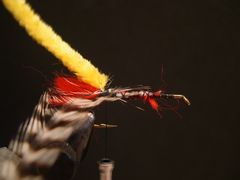 Step 6 Tie in the chenille core at the base of the feather and move the tying thread to the front of the thread wraps at the hook's eye. 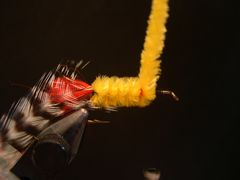 Step 7 Wrap the chenille forward with close wraps to the front of the thread base. 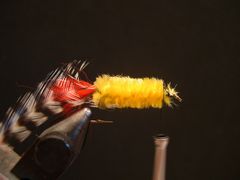 Step 8 Bind down the chenille with a couple tight wraps of the tying thread and remove the excess chenille with the tips of your scissors. 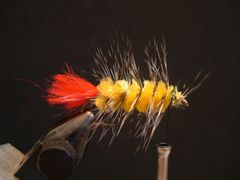 Step 9 Palmer the feather to the front of the body as shown. Bind the feather down at the front of the chenille with a couple of tight wraps and remove any excess feather with the tips of your scissors. Make sure that you don't accidently clip the thread in the process. 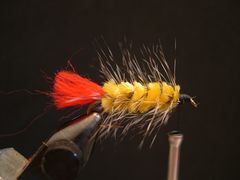 Step 10 Form a neat thread head and tie off the thread with a couple of half-hitches or a whip finish. 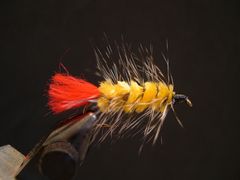 Step 11 Coat the thread head with head cement and your Wooly Worm is ready to be fished.
Warmwater Fly Tyer - by Ward Bean
© Copyright 2026 Ward Bean, Council Bluffs, IA, All rights reserved. © Copyright 2026 Ward Bean, Council Bluffs, IA, All rights reserved.
|