Wet Flies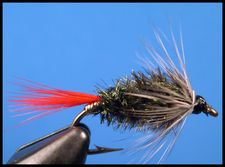 Gray Hackle PeacockThe Gray Hackle Peacock along with it's counterpart, the Brown Hackle Peacock, is as good at taking Brim as it is at taking trout. Materials List
Tying NotesThe Gray Hackle Peacock is a pretty straight forward fly to tie. Tie in the tail first, then the body, and finally the collar. Form a neat head and the fly is finished. But, I do a couple of extra steps to make the fly more durable and more buggy looking. The first of those steps is to form an underbody that tapers from the head to the tail. It's not necessary, but it give the bug a fuller and more natural looking body. The other step is to make a "peacock herl rope" by twisting the herl with tying thread as the body is being formed. It makes for a much stronger body that somewhat resists fish teeth. Angling TipsDon't tie this fly with lead. It ruins the fly's action. If you want it to sink faster fish it on a sink-tip line that's been cut back to five feet. To impart as much actions as possible, attach the fly to the leader with a Duncan Knot, sometimes called a Uni_knot or with a Non-Slip Mono Knot. Check out the "On The Water" page to learn how to tie those great fishing knots. Fish the Gray Hackle Peacock slowly with a figure-eight line hand retrieve. Tying Instructions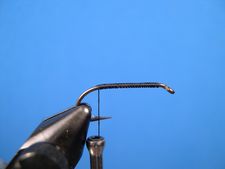 Step 1 Clamp the hook in the vice and crimp the barb. Start the thread at the hook's eye and cover the shank with the tying thred back to the hook's bend. 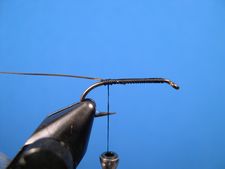 Step 2 Tie in a three-inch piece of gold tinsel at the bend to form the gold tag. 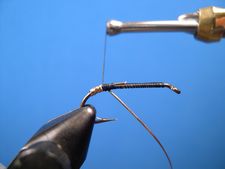 Step 3 Take three or four turns of tinsel to form the tag. Tie down the tinsel and remove the excess. 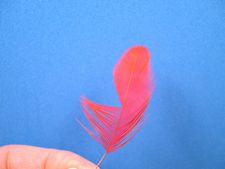 Step 4 Select a red feather, strip away the fluff from the base of the stem, and isolate several barbs to be used for the tail. 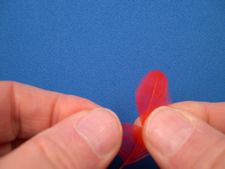 Step 5 Remove the barbs for the tail as shown in the photo. 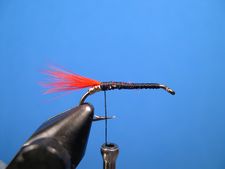 Step 6 Attach the barbs at the hook's bend. The barbs should extend beyond the bend about half a hook length. 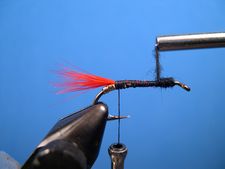 Step 7 Put a spool of Uni-Yarn in a bobbin. Start the Uni-Yarn at the front of the hook in the same way that you started the tying thread and build an underbody that tapers slightly from front to back as illustrated in the next step.  Step 8 Once you are satisfied with the taper of the underbody, tie off the Uni-Wool with a couple of turns of thread as shown in the photo. 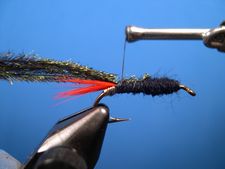 Step 9 Select two peacock herls from a peacock stick, even them, and trim their tips and butts. If you don't have a peacock stick, which is supperior to strung herl, use the strung herl. Tie the peacock herls in by their tips at the base of the tail. 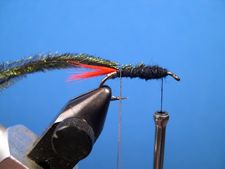 Step 10 Make a herl rope by marrying the two strands of herl with the tying thread. To do this procedure you first have to make a dubbing loop. To make the dubbing loop pull the thread toward you until the thread is slightly longer than the length of the peacock herls. Pass the thread over the index finger of your left hand to from a loop of thread and return to the tie in poinf or the herl. Lock the loop of thread in place by taking a couple of turns of thread over itself. Then move the working thread forward to the front of the hook. You now have a loop of thread at the base of the peacock herl that's a little longer than the herl. Aligh the herl with the loop of thread and grasp the butts of the herl and the thread loop with a hackle pliers. You now have a herl rope. Twist the herl rope a couple of times and begin to wrap the rope up the hook shank. Keep twisting as you wrap. The thread, imbedded between the two herls, makes the herl rope. 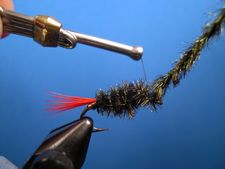 Step 11 Wrap the herl rope forward twisting the rope two or three times as you make each wrap. When you reach the front of the fly, tie of the rope with a couple of thread wraps and remove the excess material. 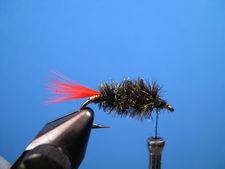 Step 12 Be sure that you leave enough space at the front of the hook for the collar and a neat thread head. At this point your fly should look like the one in the photo. 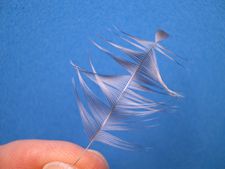 Step 13 Select an appropriate grizzly hen neck feather. The barbs on the feather should be long enough to reach the hook point when the feather becomes the collar. Remove the fluff from the base of the stem, stroke back the fibers, and trim the tip of the feather as shown, in preparation for tying in the feather. 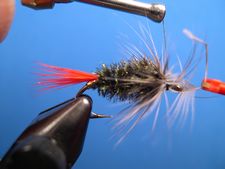 Step 14 Take three or four turns of the feather to form the collar. Leave enough room for the thread head. Take a couple of turns of thread to bind down the stem and remove the excess. 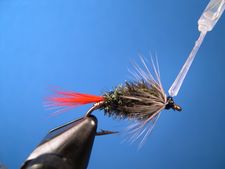 Step 15 Form a neat thread head. Tie off the thread with a couple of half-hitches. Coat the head with head cement. 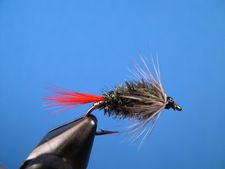 Step 16 Your Gray Hackle Peacock is finished.
Warmwater Fly Tyer - by Ward Bean
© Copyright 2026 Ward Bean, Council Bluffs, IA, All rights reserved. © Copyright 2026 Ward Bean, Council Bluffs, IA, All rights reserved.
|