Terrestrials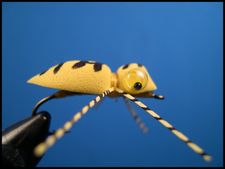 Yellow Sponge BugThe Yellow Spong Bug is easy to make and it's very durable. Some anglers will tell you that it's the only fly they use when bluegills are feeding on the surface. Materials List
Tying NotesThe fly in the tying sequence has a sponge body that's compatable with the size of the hook. The hook also has a straight eye. A hook with a turned down eye doesn't work as well. Sponge bug bodies are sometimes hard to locate. I buy mine from Angler's Supply House. Live Rubber (100% pure rubber) used for the legs on the sponge bug is also hard to find. But Angler's Supply House also stocks it in a variety of colors in medium and small sizes. Tying Instructions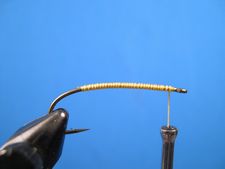 Step 1 Clamp the hook in the vice, crimp the barb with needle nose pliers, and start the thread at the hook eye. Cover the shank from the hook's eye back to the bend and back again with three or four layers of thread. Let the thread hang at the hook's eye. 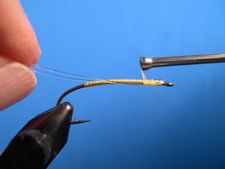 Step 2 Cut a four inch piece of Mason Hard Mono and bend it in the middle. Lay the doubled mono on top of the hook shank with the loop positioned in front of the hook's eye. Bind the two strands to the shank, with one strand on the far side of the shank and the other strand on the near side. You now have the beginning of a foundation to glue the bug's body to. Remove the tying thread. 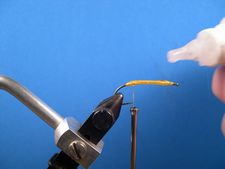 Step 3 Flatten the mono foundation with your needle nose pliers so that the mono strands are level with the hook shank. Coat the the foundation with Zap-A-Gap. 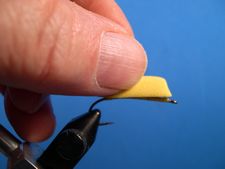 Step 4 Center the sponge body on the hook as shown in the photo and allow the glue to dry. It takes just a moment or two. 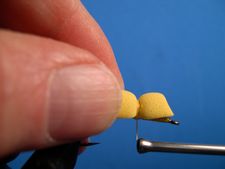 Step 5 Re-attach the thread as shown in the photo to make the bugs head. Wrap back against the body with several wraps of thread to make a space for the rubber legs. 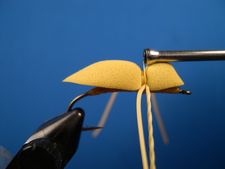 Step 6 Cut a five inch strand of yellow rubber into two equal strands. Fold and even the first strand around the thread and tie the leg in on the near side of the body with three or four turns of thread. Fold and even the second strand and tie it in on the far side of the hook with three or four turns of thread.  Step 7 Pulling the legs back, as shown in the photo, move the thread to the front of the legs and take a couple of turns of thread. Then tie off the thread with two half-hitches. 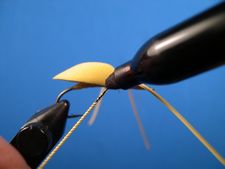 Step 8 To give your foam bug some zebra legs grasp one of the legs nearest you with your index finger and thumb. Stretch the rubber strand and roll it between your thumb and index finger until you can see visible twists in the rubber spaced closley together. Then, with a black permanent marker coat the top of the rubber strand. Don't coat the sides or the bottom of the strand, just the top. Release the strand and see the zebra stripes appear. Now move on to the other legs. You may want to practice this a few times before you do it on a finished fly. Tie a few strands of rubber to a bare hook and practive until you get it right. The tighter the rubber the closer the strips. 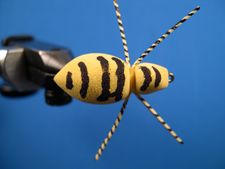 Step 9 Decorate your sponge bug with the permanent marker. Here is how this one looks from the top.  Step 10 Here is the sponge bug looks from the bottom. 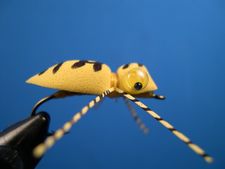 Step 11 Glue the small plastic doll eyes to the head with a touch of Zap-A-Gap and your Yellow Sponge Bug is ready to fish.
Warmwater Fly Tyer - by Ward Bean
© Copyright 2026 Ward Bean, Council Bluffs, IA, All rights reserved. © Copyright 2026 Ward Bean, Council Bluffs, IA, All rights reserved.
|