Bottom Flies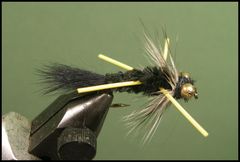 Carter's Rubber-Legged DragonThis is the fly of choice on Georgia's Callaway Lakes for the big Bream that live in them. Materials List
Tying NotesThe Rubber-Legged Dragon is the fly of choice for the guides on Callaway Garden's lakes and ponds. It is the first fly that guides recommend to their clients for taking the slab-sized bluegills that are found there. Carter Nelson generally ties the flies in this series, including the Rubber-Legged Dragon, on a size 10 hook. In the tying sequence that follows, the Dragon is tied on a size 8 hook. Carter also recommends black small chenille for the Dragon's body. In the tying sequence, I'm using medium chenille that provides a tapered body. The tapering is done with the tips of your scissors. It makes the body look more realistic - fatter in the thorax area and thinner in the tail area. 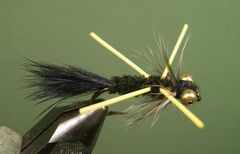 The Dragon in the photo at the right has a body made with small chenille. You can see that there is very little taper to the body. You can use either medium or large bead-chain eyes. I prefer to use medium sized eyes. I like to use a hen neck feather for the collar on the Dragon, but any webby feather will work. Angling TipsFish this little guy on a weight-forward line with at least a seven and one-half foot leader. I like to fish it at different levels in the water column with short strips and pauses. I also like to fish it very close to the bottom where Dragon Fly Nymphs and other creatures live. Be sure to attach the Rubber-Legged Dragon to your leader tippet with a loop knot like the Uni-knot. If you're not familiar with fixed loop knots check on the "Warmwater Knot" page.  Tying Instructions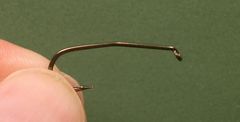 Step 1 Before you clamp the hook in the vice, bend it to this shape with your pliers. This helps the hook right hook-point up and prevents snagging.  Step 2 Clamp the hook in the vice and crimp the barb. Attach the thread slightly behind the hook's eye and lay down a base of thread back to the hook's bend. 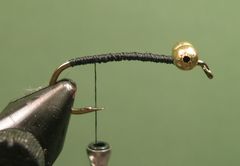 Step 3 Attach the bead-chain eyes with several figure-eight wraps of thread. Some super-glue on the thread helps lock the eyes in place. 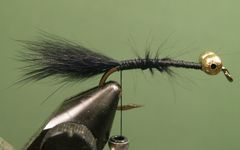 Step 4 To make the tail, clip a small bunch of fur from a Zonker Strip and attach it at the hook's bend. 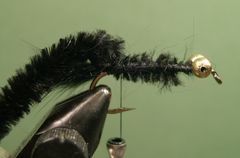 Step 5 Butt a piece of chenille up against the eyes and bind it to the hook's shank back to the base of the tail. 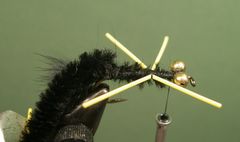 Step 6 Attach the rubber strands, for the legs, to the hook "Madame X" style. Attach one strand to the far side of the hook's shank and the other to the near side. Trim the legs so that they are about one-half inch long. 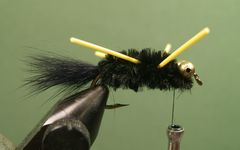 Step 7 Wrap the chenille forward, with one turn through the legs, to the bead chain eyes and tie it in. Remove any excess chenille. 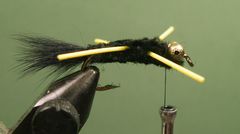 Step 8 Taper the top and bottom of the body from the legs back to the tail with the tips of your scissors. A curved scissors works best for this job. If you're using small chenille you can skip this step. 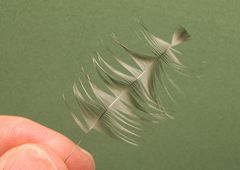 Step 9 Select and prepare an appropriate feather for the collar. Notice the tip that will be tied in before the collar is formed. 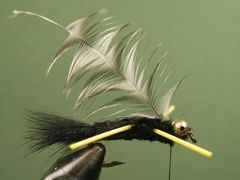 Step 10 Tie the feather in by the tip behind the bead chain eyes with the cupped side of the feather facing the hook. 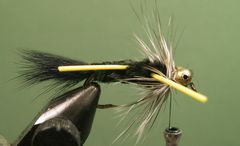 Step 11 Take two or three turns of the feather to form the collar and tie it in. Remove any excess feather. 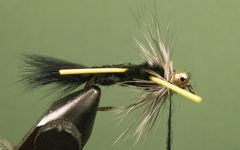 Step 12 Apply a thin noodle of dubbing to the thread in preparation for making the head. 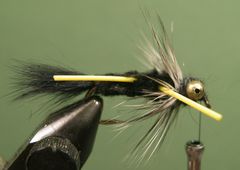 Step 13 Make several figure-eight wraps around the bead chain eyes until a head appears around the eyes. Once you are satisfied with the shape of the dubbed head, tie off the thread with a couple of half-hitches or a whip finish. 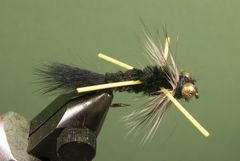 Step 14 Your Carter's Rubber-Legged Dragon is finished.
Warmwater Fly Tyer - by Ward Bean
© Copyright 2026 Ward Bean, Council Bluffs, IA, All rights reserved. © Copyright 2026 Ward Bean, Council Bluffs, IA, All rights reserved.
|