At The Bench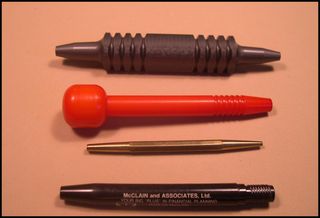 Fly Tying ToolsHere are my favorite fly tying tools. Some are purchased from fly fishing and tying outlets, some are home made, and some are available from hardware stores, second-hand shops, even the grocery store. Fly Tying Vice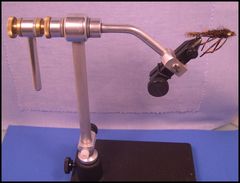 There are several vices on the market. Many cost several hundred dollars and others are much less. I have been using a Renzetti Travelers Vice ever since the vice was first introduced fifteen or so years ago. When I purchased the vice it sold for about a hundred dollars. That same vice today sells for half again that much, but it's still one of the best vices on the market for the money. The vice is true rotary which means that you can turn the vice's jaws three-hundred and sixty degrees. That's important. You can work on your fly from any angle. Again, if you're serious about tying flies you should purchase a rotary vice. Fly Tying Scissors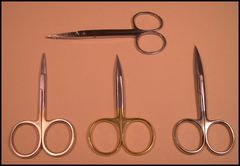 There are several brands of good fly tying scissors available as well as a lot of junk. Stay away from the junk. By that I mean, if a scissors sells for less than ten dollars I would be leary of it. The scissors in the photo are those most used by me. The scissors at the top is a cheap pair that I use for work that may dull my good scissors. I use it to cut heavy materials like Mason Hard Mono, lead wire, etc. Every bench should have a pair in the tool caddy. The other scissors shown in the photo are all offered by Dr. Slick, and like my Renzitti vice I have been using them for years. The cost between ten and fifteen dollars a pair depending on the type you purchase. The pair on the left of the photo is 4-inches long and straight, the pair in the center is 4-inches long with a curved serrated blades. Curved scissors are great for deer hair work and trimming slippery materials. The pair on the right is four and one-half inches long. It's curved and serrated also. I have used that pair longer than I can remeber and it's as sharp today as it was when I purchased it. Thread Bobbin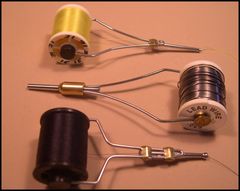 There are a number of different brands of bobbins on the market selling from three dollars up to twenty dollars or more. My favorite brand is Griffin Ceramic Bobbins. They have ceramic inserts in the end of the tube that prevents thread fraying. The bobbins are also outfitted with Delrin beads that hold the thread spool very well. Griffin Bobbins sell for around ten dollars and they come in a variety of styles The bobbin at the top of the photo is a "Supreme." It's good for general purpose tying work. The bobbin in the middle is commonly referred to as a "Materials Bobbin." It has a larger diameter tube that will accomodate floss, small chenille, and lead wire. Using a materials bobbin is the only way to wrap lead wire on a hook's shank. The bobbin at the bottom of the photo is a "Magnum Supreme." It has a shorter barrel that makes it ideal for spinning and stacking deer hair. Bobbin Threader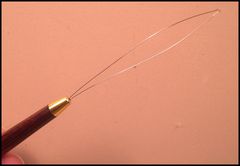 The bobbin threader is necessary to get the thread through the bobbin's barrel in preparation for starting the thread on the hook's shank. There are a variety of them available, priced from a dollar or two up to ten to twelve bucks for threaders like the one shown in the photo. Thread Caddy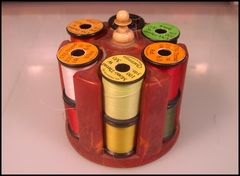 Every bench should have a thread caddy to hold your favorite colors and most used spools of thread. Thread Caddies are generally made of wood, metal, or plastic. Some are beautiful pieces of the wood workers art. Most are realativiely expensive. But I believe that they are necessary. The Thread Caddy in the photo belonged to my late mother in law. It held her sewing thread. Keep your eyes open if you go to flea markets, antique stores, yard sales, or thrift shops. You might be suprised what you find. That's where this thread caddy would have ended up if I hadn't had my eyes on it. Half-Hitch Tools I prefer to tie off thread with half-hitches instead of a whip finish. Two half-hitches - one directly on top of the other - is just as good as any whip finish. Just as with a whip-finish, you can half-hitch thread with your fingers but you can be more precise with the placement of your half-hitches if you use a tool designed for that purpose. The photo shows four different kinds of half-hitch tools. At the top is one that was especially made for me by a friend who is a milled plastics fabricator. It's not available on the market. The red half-hitch tool is made from extruded plastic and is offered by different fly fishing mail order houses. It comes in a set of three different sized tools for a couple of bucks for the set. It also can be used as a hair packer. The brass half-hitch tool is one in a set of three different diameter tools offered by StoneRiver Outfitters for four dollars. It's a good buy. You can find StoneRiver's web address and on-line catalog on the "Links Page." StoneRiver is one of my favorite fly tying materials sources and they have a beautiful catalog. The half-hitch tool at the bottom of the photo is home made. It's the barrel of a ball-point pen that works just fine and it didn't cost anything. Fly Tying Bodkin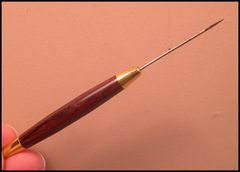 The bodkin is another useful tool on the bench. I use it for cleaning cement out of a hook's eye and for picking out dubbing to make a nymph look buggier along with other tasks that require a tool with a needle-like point. The bodkin in the photo, manufactured by Wasatch, has a rosewood handle and brass fittings which make it much more expensive than most bodkins. The brass butt on the tool is milled to allow you to use it to make half-hitches. Fly Tying Tweezers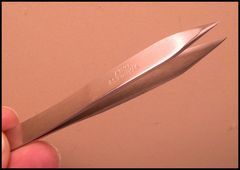 A good pair of tweezers are also a useful tool on your bench for plucking errant hackle barbules, picking out dubbing, holding feather stems, etc. The tweezers in the photo is manufactured by Tweezerman Tweezers and it's available from StoneRiver Outfitters. Tweezerman tweezers are quite expensive, priced from thirteen to twenty dollars depending on the style that you purchase - needle, slant, or point. I recently saw some tweezers similar to the tweezers in the photo at Walgreens for much less. You might want to check out your local store. Needle Nose Pliers and Side-Cutters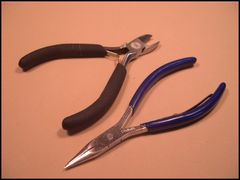 These two tools, available at your local hardware store, are almost as useful as any tool on your bench. After I clamp the hook in the vice, the first thing I do is crimp the barb with the needle nose pliers. A crimped barb sticks a fish as good or better than a hook with the barb left the way the hook was made. It's easier to remove the hook from the fish and it's a lot easier to remove the hook from your carcass if the hook's point happens to end up there. The needle nose pliers is also useful for bending hook shanks. The side cutters is useful for a number of heavy duty jobs on the bench. Cutting heavy mono, cutting the bend off the hook of a trailer on a jointed fly, and cutting lead and wire are three jobs that come quickly to mind. Single Edge Razor Blade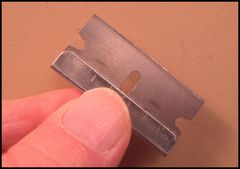 Among other tasks the single edge razor blade is handy for cutting foam, cleaning materials off a hook when you have messed up a fly in progress and want to start over, and for scraping dried glue and adhesives off your bench or tools. Dubbing Brush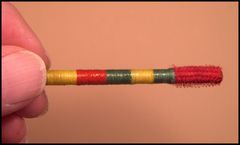 Here is a useful tool that you can make with very little effort. The idea came from Dave Whitlock. I use the dubbing brush to really scruff up the dubbing on many of the wet flies that you will find on the "Wet Flies" pattern page. All you need is a small dowel, a piece of velcro with the hooks, and some thread for a decorated handle. 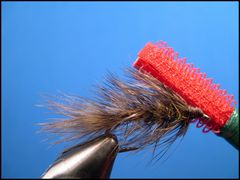 The photo at the right shows how I use the dubbing brush, even on the smallest nymphs, to tease out dubbing. You can brush lightly pulling out a small amount of dubbing or you can brush a fly vigorously like is being done in the photo at the right. If you want to build your own dubbing brush, click on the link below. Unique Hackle Pliers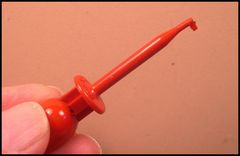 This is the best hackle pliers I have ever used and I have tried most of them. It's ideal for wrapping any hackle your fly pattern requires and it does it with ease. The round top of the pliers easily rolls in your fingers to keep the curviture of the hackle facing in the appropriate direction as the hackle is wrapped on the hook's shank. 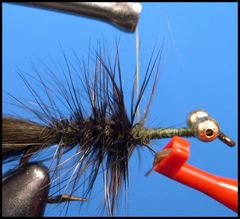 As the top is depressed, the hook extends from the tip and grasps the hackle stem or the hackle tip tightly. I tie most hackle for collars and skirts in by the tip and the hook has never broken one off. The only source for this hackle pliers is Feather-Craft Fly Fishing in St. Louis, Missouri. Feather-Craft refers to it as the E-Z Hackle Pliers. You can order it from their beautiful catalog or over the web by clicking on: Double Edge Razor Blade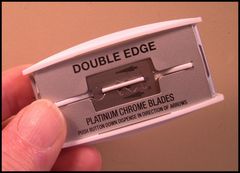 I love to spin, stack, and trim deer hair on hair bugs and divers and I couldn't do it without the help of a double edge razor blade. This is the blade to trim and shape hair bugs with. A single edge razor blade won't work. When I first started shaving my dad gave me a razor that used the double edge blade. That was a long time ago. 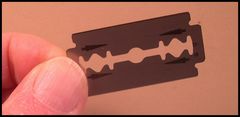 In those days you could by double edge razor blades in drug stores, hardware stores, and even grocery stores. Today, the only place I can find them is at WalMart. The best way and the safest way to use a double edge razor blade is to make two blades out of it. That way you can use it without the risk of cutting your finger as you trim a deer hair head or body to shape. 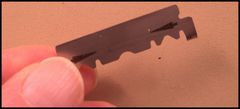 If you're careful you can make two blades out of one by carefully bending the double edge blade in the middle. The safest way is to use kitchen scissors to cut the blade in half length-wise. By holding the half-blade between the tumb and index finger of your hand you can bend the blade to perfectly round the top of a hair bug. 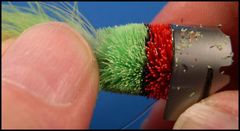 This photo shows how well you can make a beautiful deer hair body or head by trimming it with half of a double edge blade bent with your thumb and index finger. Deer Hair Packer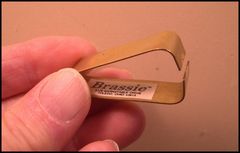 You can't build deer hair bugs and divers if you don't have a tool to pack the hair tightly. There are a number of hair packers available including one that you can make out of the barrel of an old fashioned ball point pen but the best hair packer on the market is the "Brassie." The "Brassie" hair packer pushes the hair evenly against the rear of the hook and so that it can be packed as tightly as possible. 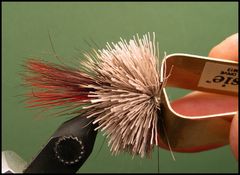 The "Brassie" can be purchased in some fly shops and through some mail order houses but I would recommend that you order it from it's originator, Chris Helms at his fly fishing and materials company. You can request a catalog on-line or place an order by clicking on his web address. Hair Evener/Stacker Another tool that's necessary on the tying bench is the hair stacker. You place a bunch of deer hair in the stacker by the tips and tap it on the bench a couple of times to even the hair. When the stacker is seperated and the deer hair is removed all of the hair tips are even. 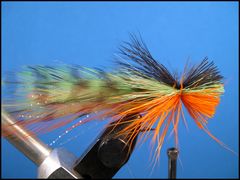 Stacked deer hair is used for wings, collars, and skirts on a number of warmwater flies. I most often use the stacker to even deer hair when I want to use the hair for collars on deer hair bass bugs. The fly in the photo is the Fence-Rider Frog. The deer hair skirt composed of seperate bunches of black, green, chartreuse, and orange deer hair tips have been given the hair stacker treatment. Prismacolor Markers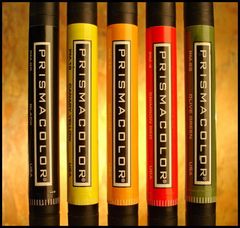 There are a number of waterproof permenant markers on the market but Prismacolor Markers are the best. The are available in a variety of colors, are very color fast, and each marking device comes with a fine point on one end of the marker and a broader point on the other end. Many fly tying outlets offer the markers and they can be purchased at most craft stores. Prismacolors include ultra marine, pink, dark purple, black, leaf green, crimson red, olive green, bronze, chartreuse, orange, dark brown, and cool gray. Deer Hair Comb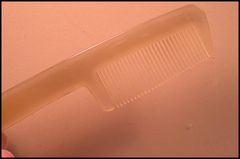 If you are tying flies that have deer hair or wool heads or bodies you definately will need a deer hair comb to comb the underfur out of a clump of deer hair before you spin or pack the clump on the hook's shank. If you are working with wool you will use it to comb the tangles out of a clump of wool before you tie it on the hook's shank. You could use a common hair comb for this job but Griffin Enterprises offer one that is made from bone that's ideal. It's made of bone to prevent static electricity which often occurs when you use a common comb. The Griffin Hair Comb is available from many fly fishing and fly tying mail order houses or you can order it directly from Griffin Enterprises on-line at: Ruler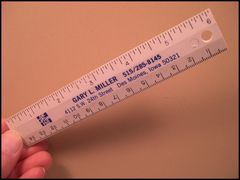 I couldn't build the kind of deer hair bugs and divers that I do without the help of a ruler. I use the front of the weed guard on hair bugs to determine the size of the bug's body or head. Proportion is critical on hair bugs. If the head or body is not proportionate to the hook the bug will not float properly. Therefore, I need a ruler to determine the exact placement of the weed guard on the hook shank before I tie in the tailing materials and ultimately spin the deer hair head. 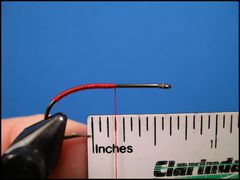 You certainly don't need a fancy ruler for the job. The best kind is an advertising ruler that's six-inches long. I also find the ruler useful in measuring the length of a fly and for measuring the amount of material I use on each fly when I'm tying several of the same flies in one setting. A good example is measuring 10-inch strands of Estaz before beginning to tie up a bunch of Red-Faced Wobblers. A 10-inch strand is what's required without wasting any of the expensive Estaz. Deer Hair GuardA home made item that I find very useful is a hair guard to keep deer hair and wool out of the way when I'm tying off a weed guard on a hair bug or diver or tying off a trimmed wool head on a streamer. Here is how I make the hair guard packet seen in the photo. First, I save all of my plastic bags that fly tying materials come in. When I have a bunch saved up I cut the bags in one-inch strips with a utility scissors. The I even the strips and staple them together. When I need a hair guard I simply cut off a one-square inch piece of a plastic strip. 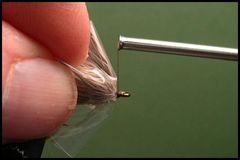 I tie off the thread with a half-hitch. Then I poke a hole in the center of the hair guard and insert it over the hook's eye. Then, I attach the thread again and proceed to tie off the weed guard, form a neat thread head and I'm finished. The photo shows how the deer hair is held out of the way during the process. Burning Point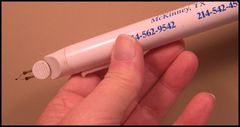 This is the ideal tool to burn eye sockets in deer and wool heads. It's also useful for removing material from the hook's eye if some of it happen to end up there when the thread is tied off.  You can also use it to make mono barbell eyes. Simply cut a piece of very heavy mono and touch the burning point to each end until the eyes are formed. Some burning tools are disposable. They are quite expensive and they don't last very long. Don't buy one. The burning point shown in the photo runs on two pen light batteries. I have had it for a number of years and have used it a lot. You can purchase one like mine from Chris Helms at Whitetail Flytieing Supplies by visiting his web site at: Hot Pot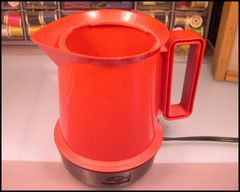 I use the hot pot to steam a deer hair bug or diver before I trim it. The steam from the hot pot causes the hair to swell and straighten. Once the bug is steamed the hair stands at a 180 degree angle to the hook's shank. Most fly tiers who like to build deer hair bugs or divers should use a hot pot. Steaming the hair makes a hair bug so much easier to trim. This is especially the case with smaller hair bugs that contain only three or four bunches of hair. The hot pot is often used by college students in their dorm room to heat water, soup, etc. They are available in the appliance section of most stores. I saw one at WalMart that retailed for about fifteen dollars. 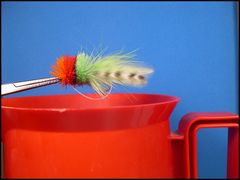 The hot pot in the photo was purchased at the Goodwill Store for a buck and a half and it's been in use on my tying bench for several years. Thrift shops are a great place to look for a used a hot pot. To steam a hiar bug, I put about an inch of distilled water in the pot, plug it in, and wait for the steam to rise. Then, I clamp the hook of the hair bug in a forcepts and hold it over the steam as I watch the bug's body or head grow as the deer hair swells and straightens. Fly Tying Forcepts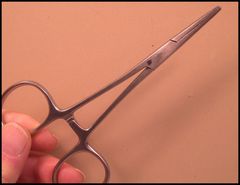 A pair of forcepts is a handy tool to have on the bench. I use it primarily to hold deer hair bugs or divers over a steaming hot pot to swell the deer hair before I trim the hair. Of course, it can also be used to remove a hook from a fishes lip when you are on the water. You just have to remember to return it to the bench when you return home. Or, you could purchase two of them. The pair of forcepts shown in the photo is available from Dr. Slick, the same company that provides the scissors used on my tying bench. Hand Held Hair Dryer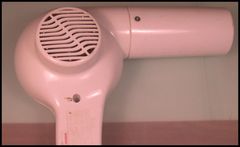 The hair dryer is another tool that I use to dry glue and adhesive on a fly that I'm constructing. I use it most frequently to dry the face of a hair bug that is coated with Flexament before I trim and shape the head or body. I also use it to renew used flies. On a day of fishing I may use two or three hair bugs or divers, a few streamers, and maybe a wet fly or two. When I return home I wash them under the water facuet, clamp them in a pair of forcepts, and blow dry them with the hair dryer. You will be suprised how good they look and how much longer they will last if you use the hair dryer to accomplish this task. Round Toothpicks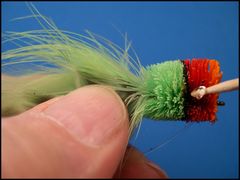 The lowly toothpick is a very useful tool on my fly tying bench. I use it to add a dollop of Goop to an eye socket on a deer hair bug or diver before I put the eyes in the socket. I have also used it to pick out dubbing on small nymphs, hold a fly for the camera as I take a photo by inserting the point of the toothpick in the hook's eye, and I have used it to clean out head cement that ended up in a hook's eye. Keep some on your tying bench and you will be suprised how many uses you find for them. Leg Sewing Tool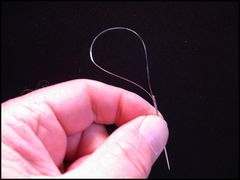 The Leg Sewing Tool is used to sew rubber legs through the body or head of a deer hair bug or diver as well as through balsa and foam heads and bodies. Dave Whitlock is the fellow responsible for comming up with the leg sewing tool. All you need to make one is a sewing needle, 5X leader material, and super glue. This ingenious little device is easy to make. All you need is a sewing needle, 5X Tippet material, and some super glue. If you would like to have one for your bench click on Leg Sewing Tool. If you would like to learn how to use a leg sewing tool, click on Whitlock Leg Sewing Tool. Trash Box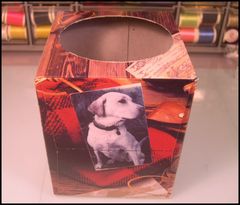 One of the problems faced by most fly tiers is that their bench becomes a mess during a fly tying session. I know my bench does. There are a number of ways to help eliminate this problem. One is to keep all of your tools in a Renzetti Tool Caddy. Another way is to have some kind of receptical for your trimmings. I like to use a Tissue Cube, like to one in the photo, for my trash. I simply remove the plastic from the opening to the box and set it on my bench. When I have throw-away materials I simply stuff them in the box. When it's full I toss it and use a replacement.
Warmwater Fly Tyer - by Ward Bean
© Copyright 2026 Ward Bean, Council Bluffs, IA, All rights reserved. © Copyright 2026 Ward Bean, Council Bluffs, IA, All rights reserved.
|