Divers and Sliders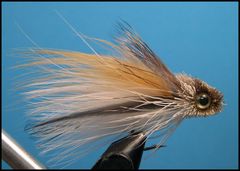 Kentucky Wonder SliderThe Kentucky Wonder Slider is a favorite of Northeast Oklahoma guide, Larry Clark, for Smallmouth and Kentucky Spotted Bass. Materials List
Tying NotesThe Kentucky Wonder Slider is a fairly simple fly to tie. Stacking and trimming the deer hair head is the only part that may give you some trouble if you're not that familiar with deer hair work. If you want to review proper hair stacking techniques click on the FenceRider Frog and check the tying steps for making the head on it. The procedure would be the same on the Kentucky Wonder. Be sure to use Blood Marabou feathers for the body. No other type of Marabou works as well. Before you tie in the Marabou Feathers remove the tip of each feather by stroking back the fronds and clipping about one and one-half inches of the tip and center stem from the feather. This allows the feather to have much more action in the water. The feathers used outside the Marabou body is often referred to as Badger Hackle and it can come from either a Rooster Chicken neck (cape) or a saddle. If you would like to see how I install eyes in a deer hair head click on Installing Legs and Eyes. Angling TipsFish the Kentucky Wonder like you would any other top water fly. You want it to mimic a wounded minnow. Short strips followed by a pause would be one method. Attach the fly to your leader tippet with an open loop knot. If you're not familiar with open knots click on Tying Warmwater Knots to learn how.  Tying Instructions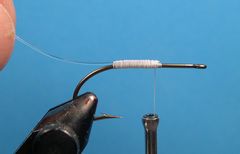 Step 1 Clamp the hook in the vice and crimp the barb. Start the tying thread at the hook's point and lay down a base of thread to the hook's bend. Then return the thread to exactly 1/4" forward of the hook point. Cut a one-inch piece of 15# Mason Hard mono. Line up the front of the mono with the front of the thread wraps and bind the mono to the top of the hook's shank back to the hook's bend. Remove any excess mono with your scissors. 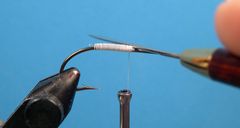 Step 2 Attaching the short piece of mono to the top of the hook's shank accomplshes three things. First it defines where the materials for the body will be placed - body on the mono material and head on the bare hook shank. Second, It provides a flat shoulder on which to attach the body materials. And, finally, as shown in the photo, it provides a backstop for the deer hair so that it doesn't slide over the body materials when you are tightly packing the deer hair. 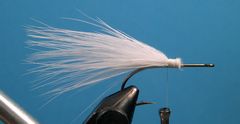 Step 3 Select a white Marabou Feather and prepare it by removing it's tip as described in the "Tying Notes." Measure the feather against the hook. The feather should be about one and one-half times the length of the hook or slightly longer. Trim the butts of the Marabou, align the butts with the front of the thread wraps, and bind the Marabou to the hook's shank with tight thread wraps as shown. 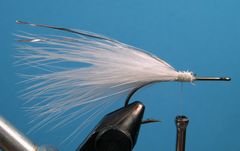 Step 4 Tie in 3 to 4 strands of Silver Flashabou on each side of the Marabou. The strands should be the length of the Marabou. 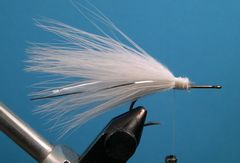 Step 5 Prepare and tie in a second white Marabou Feather directly on top of the first. 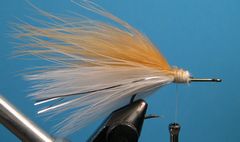 Step 6 Now, prepare a tan Marabou Feather by removing it's tip and tie it in directly on top of the white feathers. 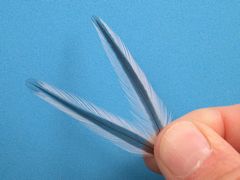 Step 7 Select and prepare two Badger Hackles of equal size - one from the left and one from the right side of the cape. Make sure that they have a prominent strip in the center of the feather. 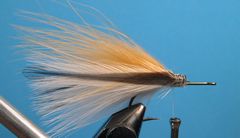 Step 8 Align the feather stems with the front of the thread wraps and tie one feather in on the far side of the hook with two or three wraps of thread. Tie the other feather in on the near side of the hook with two or three wraps of thread. 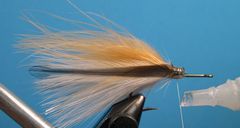 Step 9 Now, coat about one and one-half inches of the tying thread nearest the hook with Zap-A-Gap and bind down the materials with wraps of the wet thread. This will lock everything securely in place. Remove the thread. 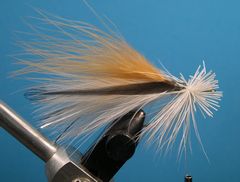 Step 10 Attach the Flat Waxed Nylon thread to the bare hook shank, slightly in front of the tail materials, in preparation for tying on the skirt made from deer hair tips. Clip a bunch of white deer body hair from the hide that, when compressed, is about the thickness of a malted milk straw. Comb out the underfur and put the hair, tips first, in a hair stacker. Even the tips with the stacker and trim the butts. Tie in the white deer hair tips on the bottom of the hook's shank directly in front of the tail windings. 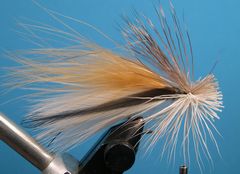 Step 11 Repeat the same process with a similar bunch of natural Deer Hair tips by stacking them on top of the hook's shank directly over the white Deer Hair tips. You have now made the Deer Hair skirt.  Step 12 Pull the tying thread through the hair and take a couple of turns of thread and a half-hitch at the base of the hair. Push the hair and thread back against the tail windings with a hair packer. 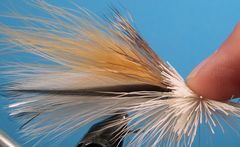 Step 13 Now it's time to build the head. Move the thread forward about three turns on the hook's shank. Clip a malted milk straw sized bunch of white deer hair from the hide, comb out the underfur and trim the butts and the tips so that you end up with a bundle about one inch long. Tie the bundle of deer hair in on the bottom side of the shank. Flatten the hair with your finger tip if necessary. 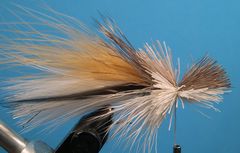 Step 14 Don't move the thread. Now clip a bunch of natural Deer Hair from the hide, trim both the butts and the tips, and tie that bundle in on top of the hook's shank. 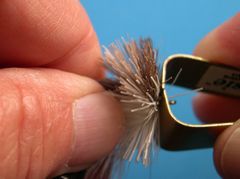 Step 15 Pull the thread through the hair and take two turns of thread and a half-hitch at the base of the hair. Pack the hair back against the skirt hairs with a Brassie Hair Packer. 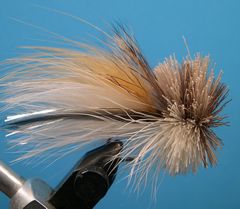 Step 16 Move the thread forward and repeat Steps 13, 14, and 15 until you have completely filled the hook's shank with deer hair. Then tie off the thread with a couple of half-hitches. 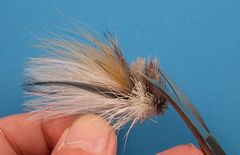 Step 17 Remove the fly from the vice and rough trim the deer hair with a curved serriated scissors. The final trim will come in the steps that follow. The bottom of the head should be flat, the top slanted, and the sides straight. 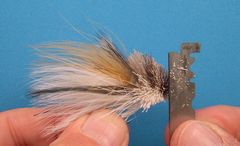 Step 18 Finish the final trim with half of a double-edged razor blade. A single edge blade won't work. To make two blades out of the double-edged blade simply cut it in half with a pair of kitchen scissors. 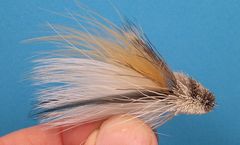 Step 19 This is the way the head should look after the head trim is complete. The head should be 3/8th inch thick with straight sides, a fairly flat bottom, with the head tapered toward the collar. 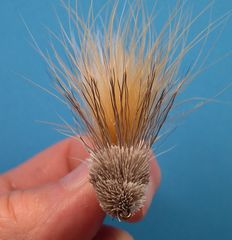 Step 20 Here is a view of the finished head from the top. 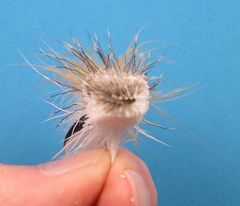 Step 21 Here is a front view of the finished head. 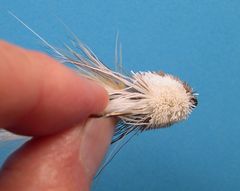 Step 22 Here is a view of the head from the bottom. 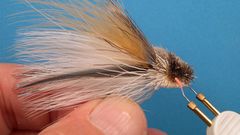 Step 23 Now it's time to install the eyes. First, make eye sockets by using the tips of your scissors or a burning point as I'm using here. 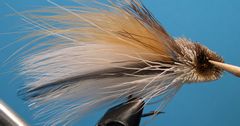 Step 24 If you used a Burning Point, pick out the bruned hair with a bodkin or a toothpick. 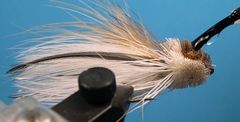 Step 25 Coat each eye socket with thinned Dave's Flexament. 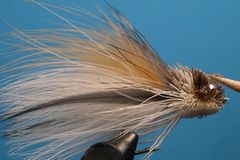 Step 26 Next, use your toothpick to put a dab of Goop in each eye socket. Goop can be purchased at any hardware store or home center. 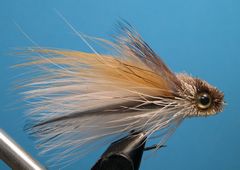 Step 27 Pop in the eyes and your Kentucky Wonder Slider is finished.
Warmwater Fly Tyer - by Ward Bean
© Copyright 2026 Ward Bean, Council Bluffs, IA, All rights reserved. © Copyright 2026 Ward Bean, Council Bluffs, IA, All rights reserved.
|